September 02, 2016 Filed in:
ArticlesMichel Enns, Teacher Runnymede CI
Michel.enns@tdsb.on.ca
I have been frustrated with gravitation simulators over the years because they stop working when the computers are updated. To avoid this, I have made one that is browser-based and will run on any device. You can find it at
www3.sympatico.ca/michael.enns. One non-standard thing that it can do is simulate the formation of a solar system with a thousand random masses.
MotivationI have found gravity simulation programs to be a useful teaching tool in my physics classes especially when students have a chance to get their hands on them rather than just watch me use one as part of a lecture.
As the years went by and school computers change the gravity simulation programs I’ve used have stopped working for various reasons. Recently my need for such a program and my coding hobby came together when I wrote a single-page web application.
My objective was to produce a program that would be easily accessible to my students. By making it as an application that could run in any common web browser I avoided the need for them to purchase or even install any software.
Because this was my first effort at putting together an interactive website using JavaScript and because I wanted it to run on as wide a variety of computers as possible the coding is fairly simple. It doesn’t use any external frameworks or libraries. The code is all on the client side and is left unobfuscated. If you are a novice JavaScript programmer like me you might find it interesting. If you’re an experienced JavaScript programmer you might find it horrifying — feedback is welcome.
The webpage is not optimized to work on a small screen. Trying it out on a smart phone will disappoint.
Features
Basic Editing
The simulation lets users set up circular masses in a 2-D space and watch how they move under the influence of gravity following Newton’s Laws. Any number of masses, I’ll call them planets, can be created or destroyed (well, any whole number). The masses of planets and their velocities can also be configured. The properties of planets can be edited while the simulation is running as well as when it is paused.
Frames of Reference
The user’s view of these planets, which I’ll refer to as the camera, can be customized in a variety of ways. It is easy to pan and zoom in and out. The camera can also be set to follow the centre of mass of all the planets. This is handy to keep the action from drifting off the screen. As well, the camera can remain centred on a selected planet. I have found this feature useful for demonstrating how the same motion can look quite different from different frames of reference. This is handy when discussing geocentric vs. heliocentric models of the solar system. It’s also a good example of inertial frames of reference, such as the initial camera view or one following the centre of mass vs. the non-inertial frame of a single planet.
Traces
Each planet can also be configured to leave a trace behind it as it moves, though lots planets leaving long traces can eventually slow down the animation. The frame of reference of the traces can be set independently of the camera’s frame of reference. This setting can be switched on the fly producing interesting and instructive comparisons of different reference frames. The traces do more than just draw a line. They show successive positions at equal time intervals. This type of diagram helps students ‘see’ position, velocity and acceleration.
Resetting and Pre-sets
At any time, the planets’ configuration can be stored and then recalled later. This can be handy for example when trying to tweak an orbit. There are also a number of pre-set scenarios
Instructions
You don’t need the instructions. Why don’t you go and play around with the simulator. There are menus and tooltip style pop-up messages for most controls. If anything doesn’t seem obvious, you can come back and read the detailed instructions below.
At this point the simulation does not have complete online instructions though there are.
- To create a new planet hold down the shift key and click where you want it.
- To delete a planet hold down the shift key and click on it.
- To move a planet, drag it.
- To pan the camera click and drag the background — anywhere that’s not a planet.
- To zoom in or out use the scroll wheel on the mouse. There are also buttons for this at the bottom of the screen.
When you click on a planet its interior changes to blue to show that it is the selected planet. You can then use controls in the
Selected Planet Data panel to change its mass, the x and y co-ordinates of its location as well as the x and y components of its velocity. The trace on check box lets you control whether or not this planet will leave a trail.
In the
Simulation Control panel you can:
- Start or pause the simulation.
- Press the set button. This stores the current state to simulations including the current mass, position and velocity of all the planets, camera location and zoom level. Traces on screen are not saved.
- Press the reset button. This restores to simulation to whatever state it was at when the set button was pushed most recently.
- Press the Clear Traces button to clear all traces currently onscreen. Planets will continue to produce new traces if configured to do so. Having a great number of traces onscreen can slow down the simulation.
- Zoom In and Zoom Out though using the mouse scroll wheel is much easier.
- Load a number of pre-set simulations.
The
Frame of Reference control panel gives you three choices of perspective from which to watch the planets move. Note that clicking on any radio button in this control panel will clear all traces.
- Original is the frame of reference used for the x and y co-ordinates and the velocity components in the Planet Data control panel. You can consider the “camera” fixed.
- Centre of Mass is a frame of reference that moves at a constant velocity with respect to the original frame of reference. It moves with the same velocity as the centre of mass of all the planets. This velocity is recalculated if changes are made to the system of planets e.g. a new planet is added. This frame of reference can be useful when you find the action drifting out of your field of view and you get tired of repeatedly panning to follow the planets.
- Selected Planet is a frame of reference in which one planet is at rest. You can consider the camera pinned to one planet, though looking down on it from above. When this option is selected which ever planet is the selected planet, highlighted in blue, becomes the frame of reference. If another planet is subsequently selected, clicked on, the frame of reference will not change unless the Selected Planet radio button is clicked again.
The
Traces control panel gives you three choices related to how traces are drawn. Note that switching between modes in this control panel will not delete existing traces.
- The simplest option is Hide Traces. This is different than the Clear Traces button in the Simulation Control panel in that the data for existing traces is not erased and, as the simulation is running, new traces can be generated but no traces are shown onscreen. Selecting one of the other two options will show all the traces that had been hidden.
- The Original Frame of Reference option will draw traces in the original frame of reference. If the “camera” is also in the original frame of reference the traces drawn will not move. However, if the camera is moving with either the centre of mass or one of the planets the traces will move after they are drawn.
- The Camera Frame of Reference option will draw traces in the camera frame of reference. In this mode the traces will never move once drawn.
The two screen shots below show the same motion — that of two planets, moving to the right, orbiting about their common centre of mass. The frame of reference (camera) is tied to centre of mass.
Figure 1 shows the traces in the frame of reference of the camera. With this view we have no sense that the two planets are drifting to the right.
Figure 2 shows the traces in the original frame of reference. The motion of the planets onscreen is identical to that in Figure 1 but as the traces are all moving steadily to the left they give the impression that the two planets are drifting to the right.
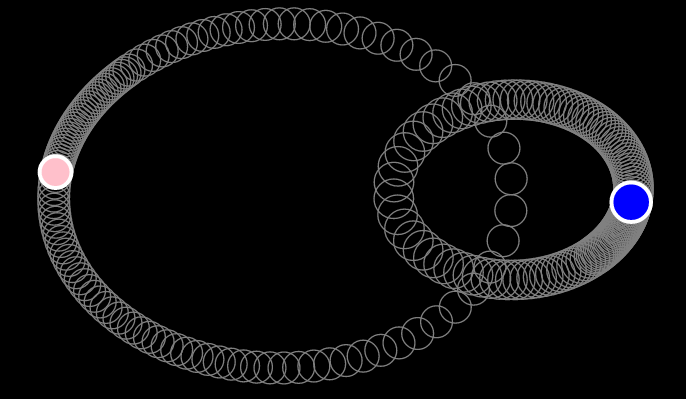 Figure 1 Traces in camera frame of reference
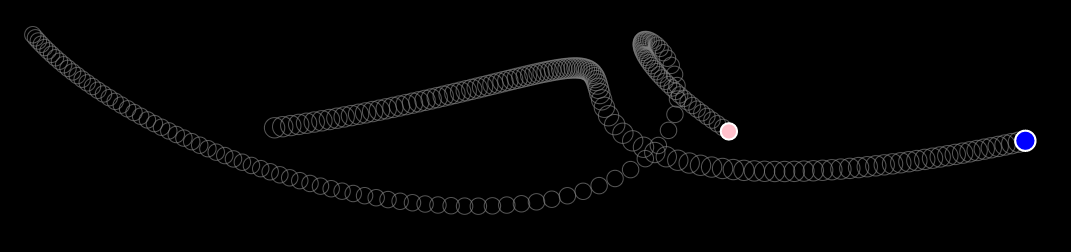 Figure 2 Traces in original frame of reference
Tags: Astronomy, Kinematics, Momentum, Motion
