Ben Davis-Purcell, Instructional Assistant, McMaster University
davispbr@mcmaster.ca
The Department of Physics & Astronomy at McMaster University recently redesigned our first-year physics programme. The most important aspect of this project was the design and implementation of a new introductory physics course (Physics 1A03). Sara Cormier
wrote about this course in detail last year, so I will just give a brief overview. Physics 1A03 sees an enrolment of about 1800 students each year, primarily by students who need one physics course to meet a degree requirement. Many students who take the course have never taken grade 12 physics or calculus, so we do not assume prior knowledge or use any calculus. Instead, the goal of the course is to give students an appreciation for physics and show its importance, focusing on concepts that relate to real-life problems. Most importantly, we want to show students that physics is not just valuable, but fun to understand and learn. In this article I will focus on some of my favourite ways in which we make Physics 1A03 fun. I will refer you to Sara’s article for a more detailed overview of the course.
I believe that one of the best ways to enjoy physics is to learn a concept and to then see what you learned in action right away. This “seeing” can happen by way of realization, a moment of “wow, that really works, this is cool!”, or by literally seeing the physics in action by way of an experiment or demonstration. We try to give students as many of these moments as possible, incorporating interesting real-life examples and demonstrations into modules and lectures. I will highlight a few of my favourite demos that we do in class.
One basic concept that is one of the most fundamental in science, let alone physics, is the idea of units and unit analysis. In science, we need to do experiments that are repeatable so that results can be confirmed by different experimentalists. This is only possible if all experimentalists are on the same page when describing a measurement — this boils down to using the same units. We have a straightforward discussion of this concept in class. A professor can do this simply by asking the class “how tall am I?” To answer the question, we get a couple student volunteers to come to the front and measure the height of the professor in three different ways: one student uses a roll of toilet paper, a second student uses a roll of paper towel, and a third student uses a standard measuring tape. Each obtains a measurement, something like 15 TP sheets versus 10 PT sheets versus 6 feet. “Which measurement is more valid?”, we ask the class. The answer, of course, is that they are all equally valid, but also all meaningless on their own unless we have some standard unit that has meaning to everyone. This is a great way to show the simple effectiveness of proper use of units. We also use this demo to lead into unit conversion, another topic that students tend to struggle with.
A second important concept is the acceleration due to gravity. Students generally know that
g has a defined value of about 9.81 m/s
2. What they often don’t realize is that this value is truly a constant (for a given displacement from the centre of the earth), independent of mass. All objects fall with the same acceleration due to gravity. This can be very hard to see because air resistance slows objects down based on their surface areas, which students can often confuse with mass. The universality of
g is an exciting concept, but one that really needs a vacuum chamber to highlight. We show an excerpt from BBC Two’s
Human Universe with Brian Cox to illuminate this idea, and the awe-inspiring effect on the class is always clear.
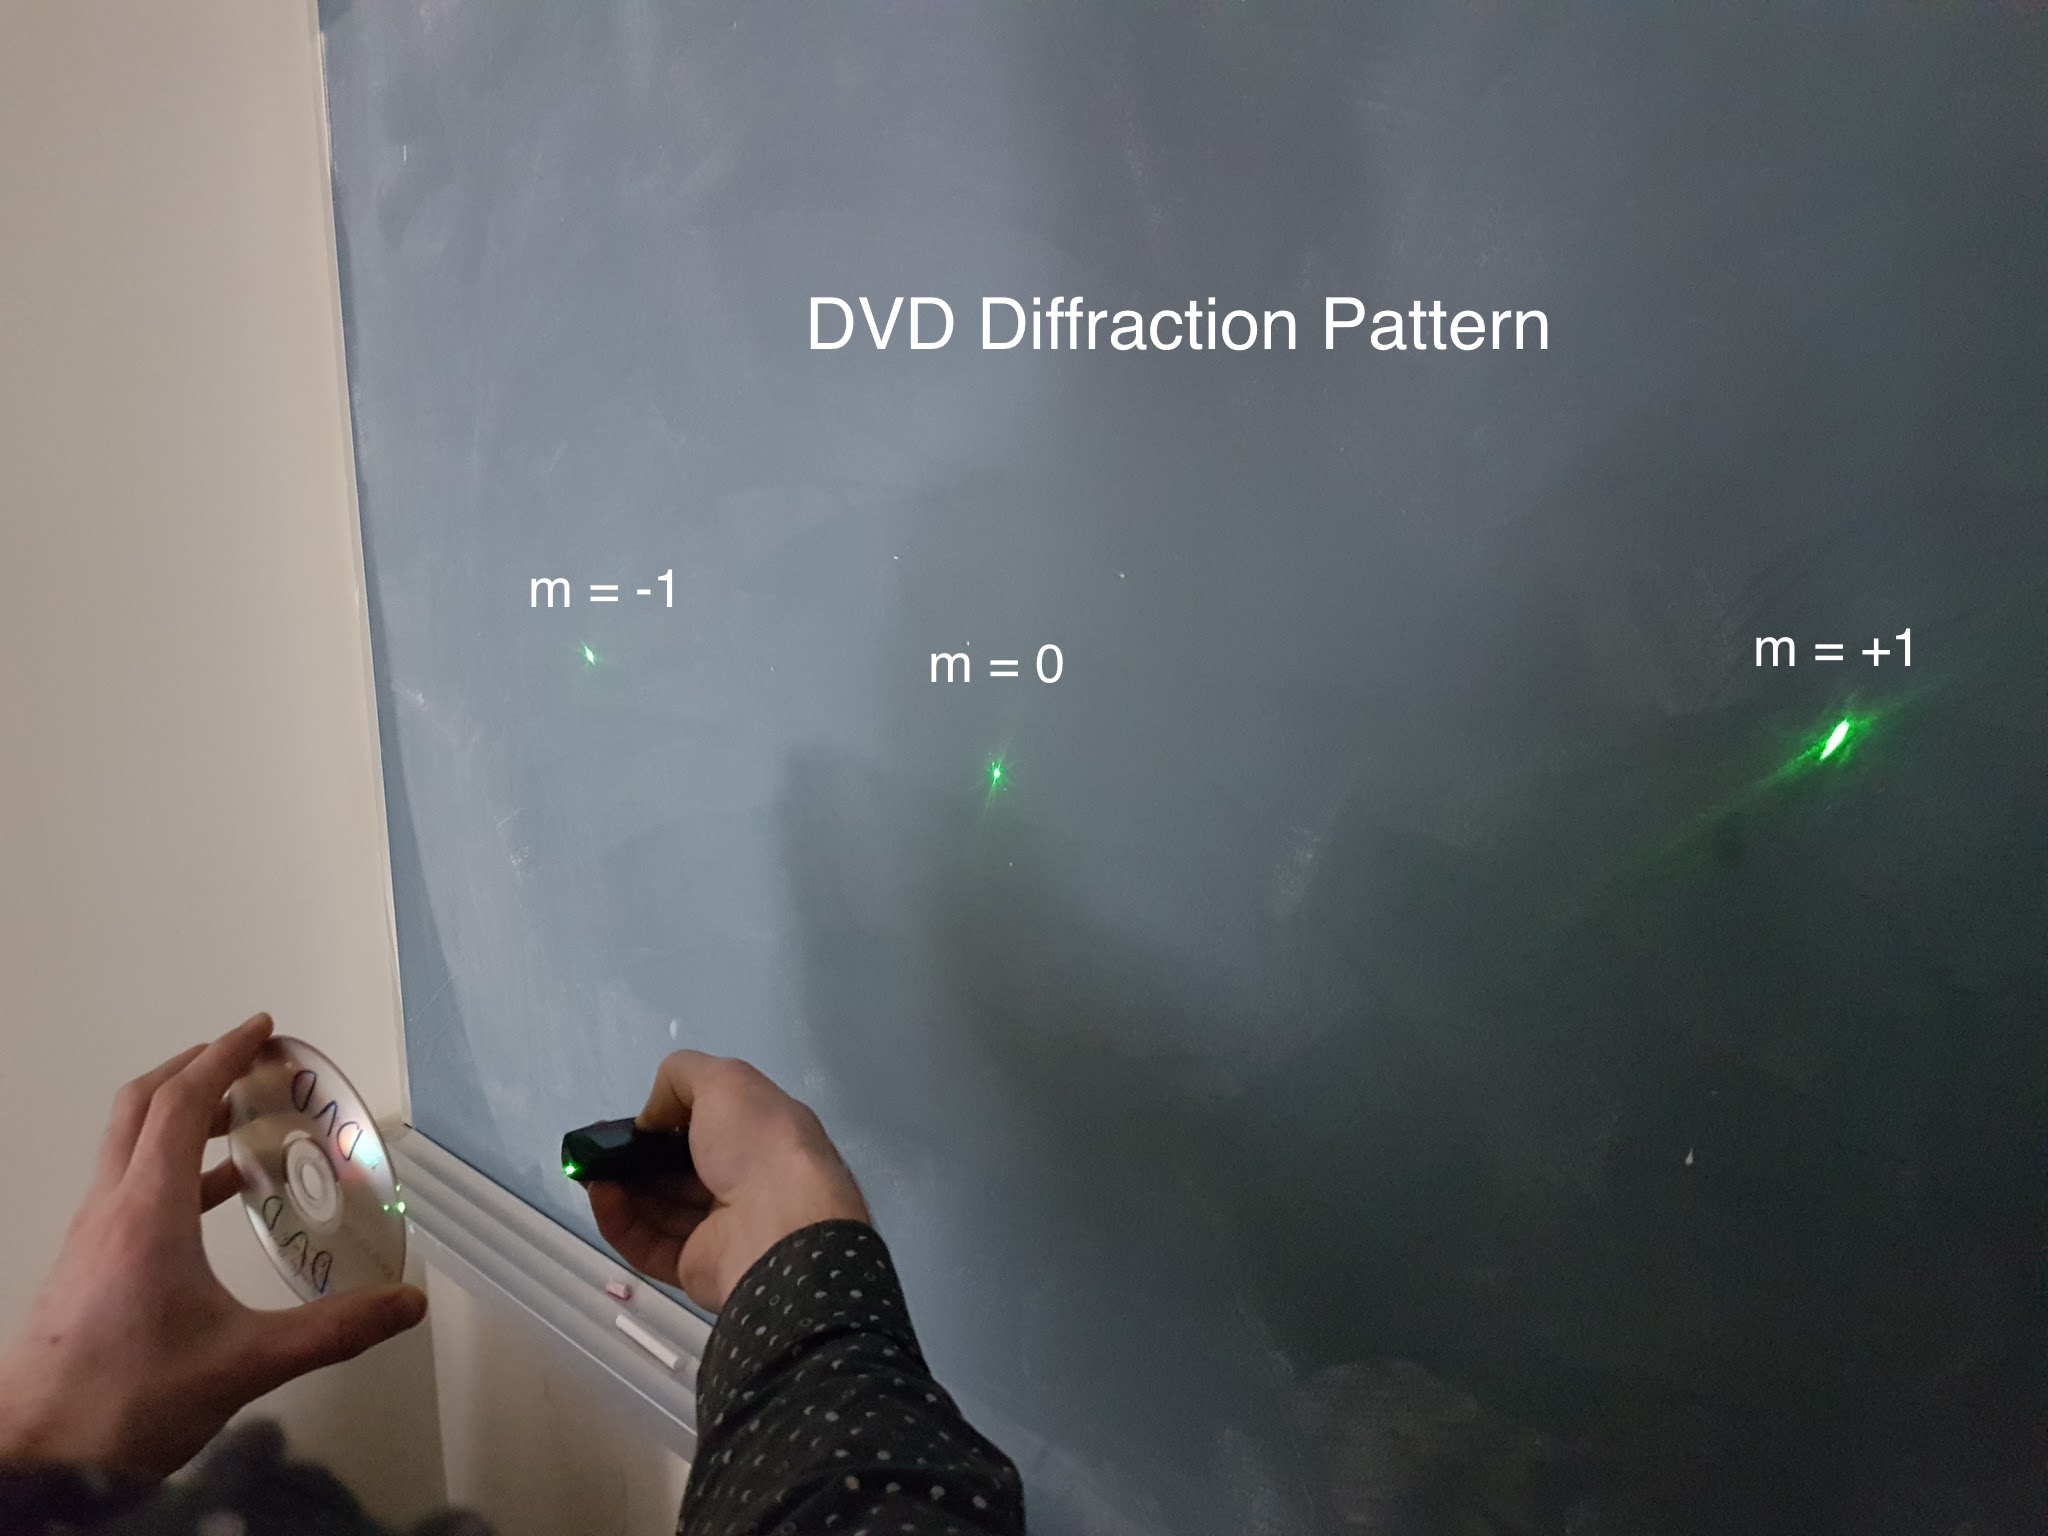
The final concept and subsequent demo that I will highlight is that of the wave nature of light and diffraction gratings. This concept is a difficult one for students to grasp, and even after multiple labs and visuals, it can still be hard to understand. One fun demo uses laser light to quickly get an accurate measure of the track spacing on a CD or DVD. Take any old DVD and shine a good laser (green light works best) on its underside, reflecting the light onto a blank projector screen. It is fairly easy to see the central bright fringe, along with the
m = ±1 fringes. The equation that we are working with here is
sinθ = mλ/d, where
λ is the wavelength of light,
d is the slit spacing, and
θ is the angle between the
m and
m+1 bright fringes as measured from the centre of the slits.
Repeat with a CD. The bright fringes are closer together compared to the DVD, meaning is smaller and therefore the track spacing
d is larger for a CD compared to a DVD. A sample comparison is shown in the images below (the camera angle was adjusted, but the distance to the board is the same for both cases).
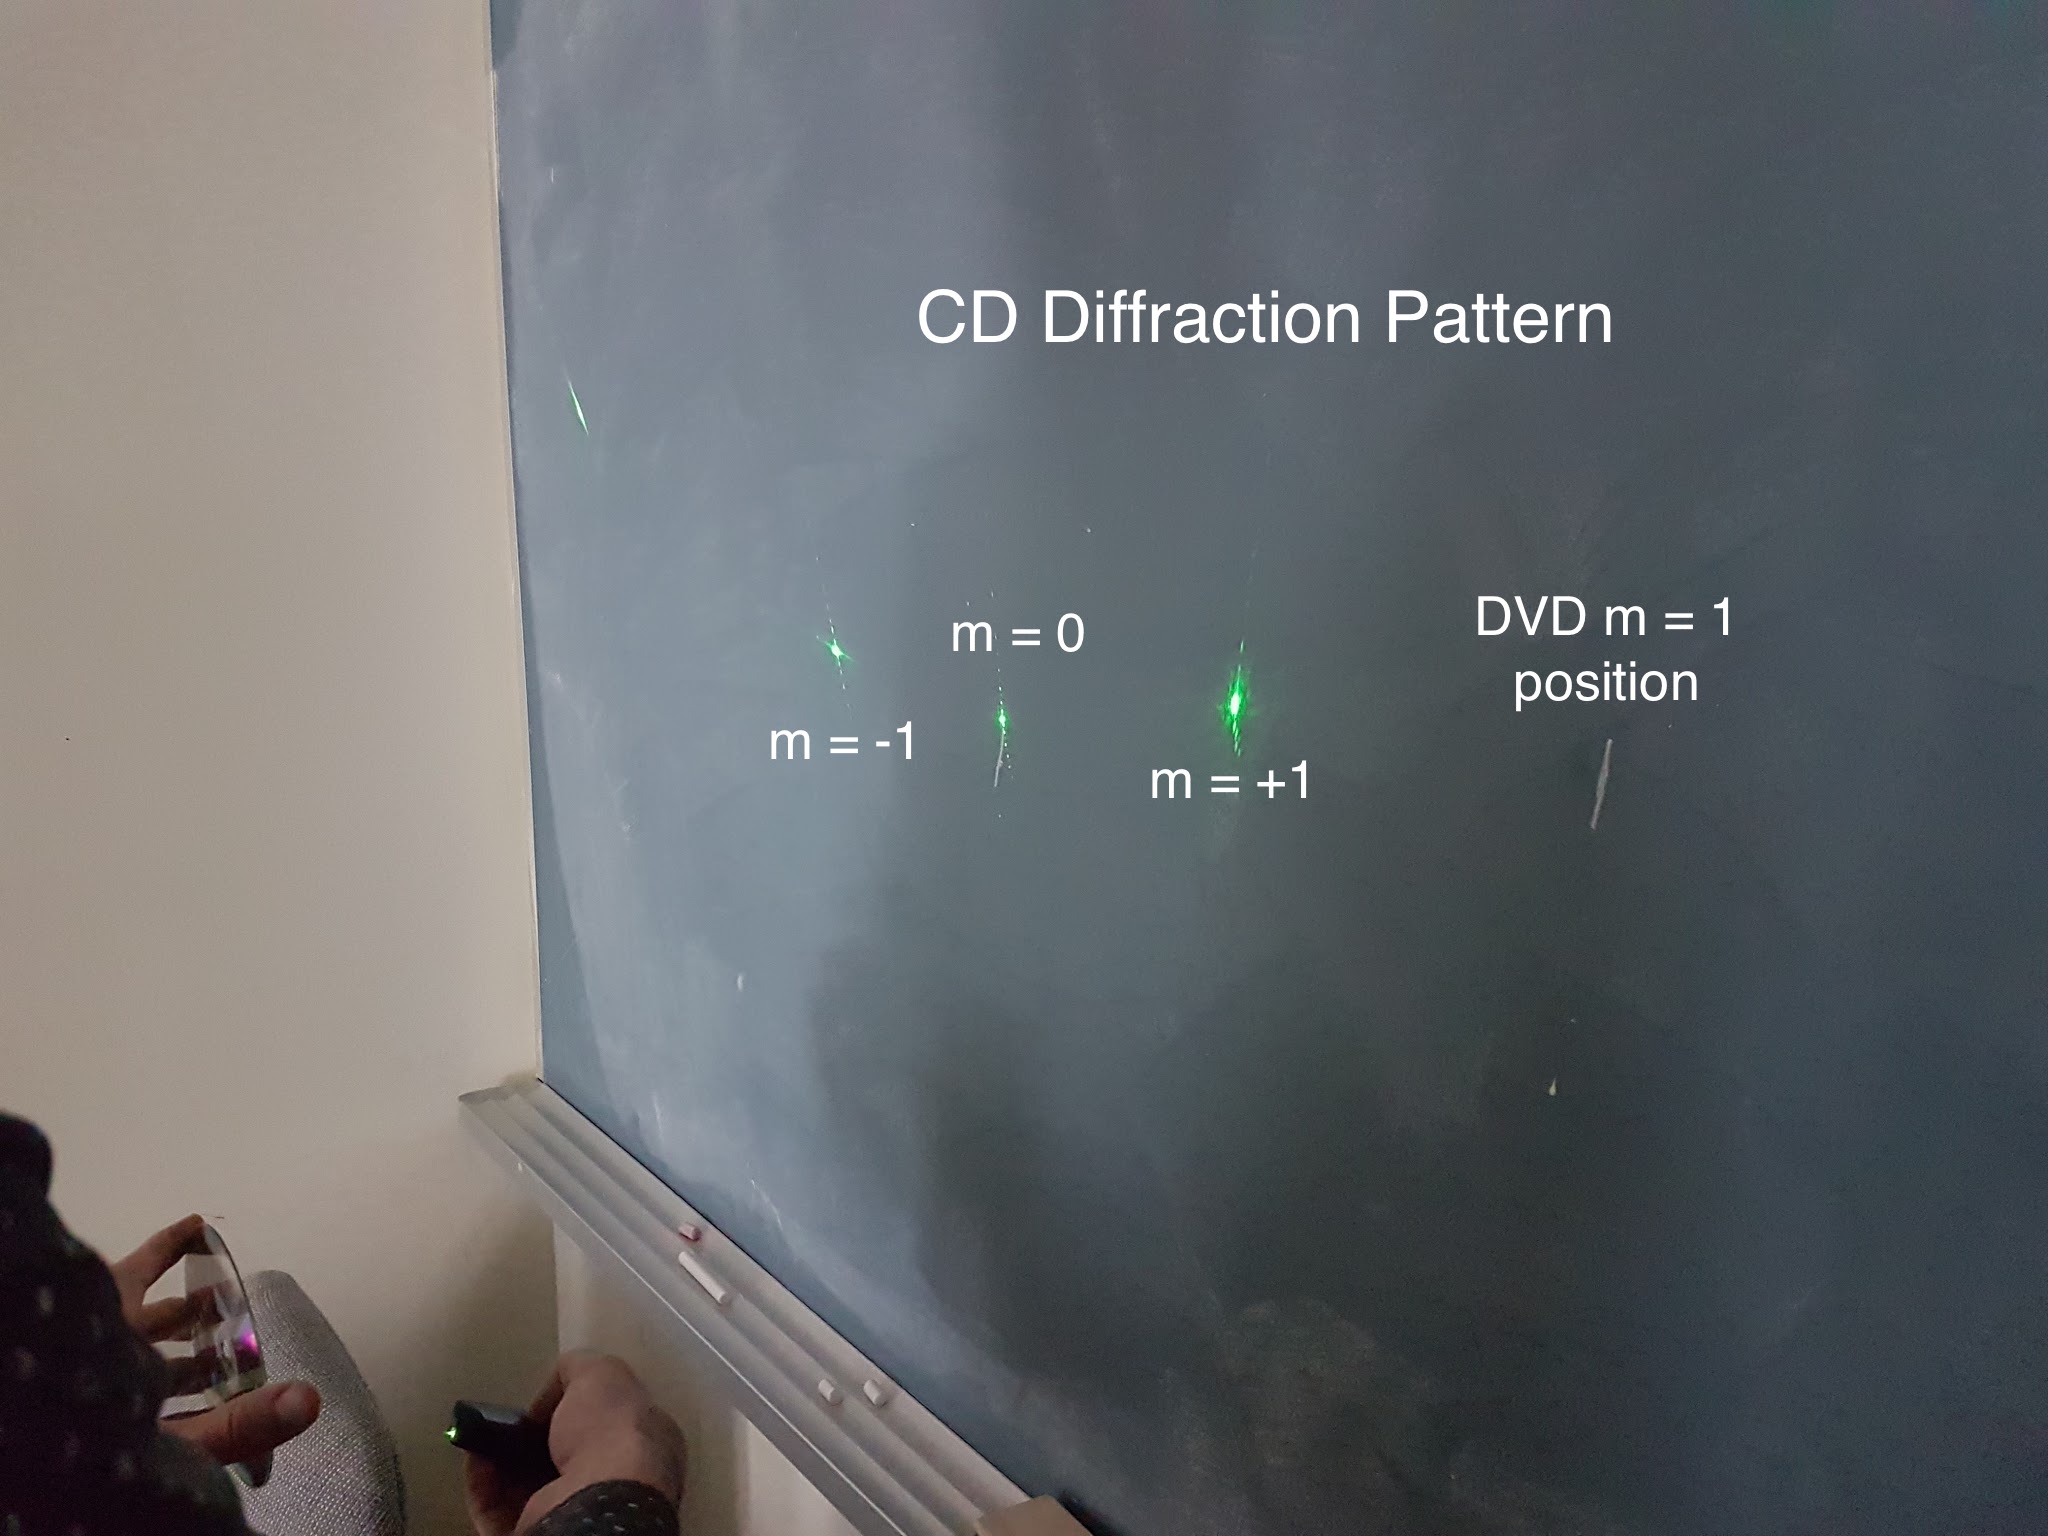
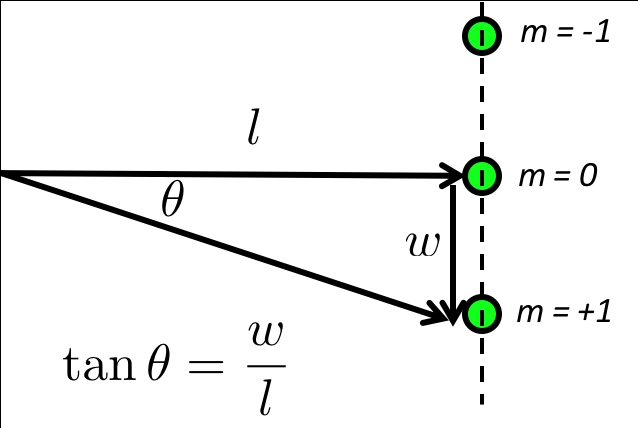
Even this casual, qualitative observation is exciting, because it explains why more data can be stored on a DVD compared to a CD: closer tracks = more storage! Measuring the track spacing of the CD requires a couple student volunteers with tape measures. One student measures the perpendicular distance from the CD to the screen (
l) and the second student measures the distance between consecutive fringes (
w). Using trigonometry, we can calculate
θ, the angle between the fringes (see the diagram).
We then display the spectrum of visible light to estimate the wavelength of the laser light (the units are in nanometers, 1 nm = 10
-9 m):

Green laser light is about 550 nm. This gives us all the necessary information to solve for the track spacing
d in the equation , since
m = 1 because we measured the distance between consecutive fringes. Inserting the numbers almost always gives an answer somewhere in the range of 1400 – 1800 nm. We then ask students to quickly google “cd track spacing” and to call out their first result. The first search result is 1.6 microns (1600 nm). The measurement is very close to the true value, especially considering our rough method, and sends an exciting shockwave of awe through the class.
These are just a few of the demos and examples that we show during lectures to help students understand and visualize concepts, and also to have some fun and do something memorable. We hope to have inspired students, and this leads into the final project for the course which we call our 5th “lab”. This is a take home assignment completed in groups of two or three. Students must film a five minute or less video of a home physics experiment that explains a 1
st year physics concept, not even necessarily one that was taught in the course. Marks are given for creativity, physics explanation, and experimental consistency with the explained physics. We encourage students to have fun with this and to be as creative as they would like. The results to date have been impressive and the feedback has been overwhelmingly positive. One sample video is shown here:
Unfortunately, many students develop a fear of physics early on in high school, or at least have the idea that physics is boring and too hard to learn. With Physics 1A03, we try to dispel these notions and show that physics has many useful lessons for everyone, no matter their specific science interests. Most importantly, we try to show students that physics is fun to see, learn, and partake in. We believe that we are well on our way to achieving this goal.
Tags: Pedagogy
