When I was first asked how I design my units and lessons, I didn't know how to explain it: I just think about the unit and put it together?! This is the challenge of teaching in a nutshell: figuring out how to unpack our thinking and explaining it to others. Three years ago, starting in the spring of 2022, I began designing a new chemistry unit for grade 10 science. At the same time, to track my work process and explain what I'm doing, I started writing this article! And now here we are in the fall of 2025, after I have taught the chemistry unit a few times and refined it. This process was especially challenging for me because the topic of chemistry is outside my comfort zone - I didn’t have longstanding practices to fall back on and had to figure out pretty much everything from the ground up. So, welcome to my pedagogical workshop, prepare yourself for an odyssey of an article!
Part 1: Starting the Design Process We begin three years ago with the first stage in the design process: deciding upon the learning goals for the unit and the strategies to meet them. To get my bearings in this unfamiliar, chemical terrain, I begin in the most exciting way possible: by reading the curriculum documents.
Step 1: Examine the curriculum. Read over the curriculum documents for the grade 9 and 10 chemistry units and then the related grade 11 chemistry units. This gives a sense of the raw content to cover as well as the relationships between prior and subsequent learning.
While important, this step was only modestly helpful! I find our curriculum documents problematic because they don't present a clear narrative thread that makes sense from a scientific perspective. Imagine that from a science curriculum! The older curriculum documents from 2008 tend towards a taxonomical or encyclopaedic approach, listing pieces of knowledge without much connection or conceptual consistency; there is no described process of scientific exploration that leads through them. We see the results of this curriculum weakness in most junior science textbooks, which are full of lists of memorisable content with little to no context or meaningful application. For example, the 2008 grade 9 curriculum lists a few physical properties of matter that seem to be chosen at random, including some that students will never use or refer to again. In a textbook, this becomes an extensive list: malleability, ductility, viscosity, and so on. I think this happens because the authors of the curriculum and the textbook don’t know what is important, meaningful, or useful about that topic at this grade level of study. When in doubt, just list what you know! This is what I mean by an encyclopaedic or taxonomical approach, resulting in content that is not grounded in any plausible student exploration. The seeds for this listing fetish are planted in the disjoint, atomised expectations of the 2008 curriculum documents. The 2022 revised grade 9 curriculum makes the opposite error: it specifies too little, making it challenging to know what students should be capable of after the unit of study. The grade 10 chemistry curriculum had its own special surprise: there is hardly anything there! Name some simple compounds, learn the types of chemical reactions, and do something with the conservation of mass. But where is the science? What should students understand about the chemical world? Aside from the conservation of mass, the content is just mechanical skills; in most lessons and textbooks, it becomes just symbol manipulation. It looks like I will have to find the science myself! To do that, we need to:
Step 2: Think like a scientist. Why is anybody interested in these topics? How were the ideas first developed? What were the landmark historical experiments that allowed people to figure out this stuff? What evidence did they see that led to the development of these ideas? And how do contemporary practicing scientists use these ideas?
These are the key questions that lead to a narrative thread. They draw science ideas together and frame them through the perspective of somebody exploring their world or applying their knowledge. And what is the spark that starts scientific exploration? It’s usually a surprising and puzzling observation where people realize they need to learn more. Imagine the first time people put pond water under a microscope, or touched frog legs to different metals. Let's create those kinds of experiences for our students and encourage students to think like scientific pioneers!
Step 3: Create the scientific narrative. Develop a sequence of explorations, preferably based on observations that can be made in the classroom, that leads students through the development of the unit’s scientific ideas. One long arc is preferable but is often not possible. There may be a few different starting points that are needed to cover the unit’s main ideas.
A sequence of explorations should lead from initial observations, to patterns, to formal ideas, and then to new observations, forming a scientifically informed narrative. This approach helps create an intrinsic motivation to learn more. It helps create a strong conceptual backbone as ideas build on one another while we tackle more disparate and complex phenomena. This doesn't have to faithfully follow a historical sequence of discovery, which is often very messy and complex. Our narrative creates a new sequence of discoveries that our students explore, as if for the first time. What matters is that this sequence makes sense to them as they build, explore, and test newfound ideas. Finding this narrative thread is quite challenging due to the jumble of ideas in the curriculum documents!
Step 4: Focus on what is important. Identify the most important ideas in the unit and the supporting ideas that lead to and from them. Pretty much everything else should be eliminated.
Content from the curriculum documents often needs to be removed. It takes time to develop a scientific understanding through inquiry, so we must cover less content to allow students the time needed to explore and construct their understanding. If an idea is rarely used within the unit of study, then it is probably not worth including since it is so quickly forgotten. Sometimes we trim a little bit here and there, like the strange collection of physics properties mentioned above. Sometimes the curriculum amputation is a little more serious, like how I remove two-dimensional motion from the grade 11 physics course because it makes no sense there. So, sometimes a lot of work is needed to find the truly important science ideas and skim off the dross. This is what a curriculum document should do for us, but here we are. After this step, we now have a narrative thread and a refined set of core ideas. It's time to think about what the students should do!
Step 5: Authentic skills and meaningful tasks. The skills students develop in the unit should model skills or thought processes used by practitioners. This will help to determine the major tasks to incorporate in the unit. The more authentic the tasks are, the more intrinsically motivating they will be for our students. Practitioners also work in teams, so group work and collaboration are essential elements of the unit design.
How do people outside of schools use science ideas? There are a lot of curious practices that take place in high school classrooms that bear no resemblance to the way people use scientific knowledge in the wider world; traditional lab reports are a good example of this. Some of these practices might be pedagogically useful, but others are just crutches that teachers lean on to manage a disjoint curriculum or keep students busy. Since teachers live their lives in the school universe, we need to pause and reflect in order to avoid these noisome practices. Outside of school, people use scientific knowledge to:
explain things (understand what has happened)
make predictions (describe the future)
test ideas (check their understanding)
build or do useful things (change the future).
Our students should spend most of their classroom time doing these things.
Step 6: Learning is about connections. Learning will be deeper and more useful when connections are made between new content and content elsewhere in the course, past studies, or life experience. Have students draw connections whenever possible, especially amongst the most recently learned ideas and the key ideas of the course. Should an idea be included in the unit? Only if it can be connected to many other ideas in the unit and beyond.
We want to avoid introducing an idea or skill, briefly using it, and then dropping it for the rest of a unit. Students’ understanding, especially of complex concepts, will become much deeper when they regularly use new skills or ideas in a variety of situations throughout the unit and hopefully across the entire course. An example of this from grade 11 physics is how we continue to draw motion graphs throughout the forces unit and beyond. In grade 9 chemistry, we keep using the particle model of matter (kinetic molecular theory); this might be the most important idea in high school science, so it should be used at every grade level and in most units. To do this, we need to approach each learning task more thoughtfully and draw more connections from each experiment or observation. There is a risk of this becoming tedious or overwhelming, but if it is done well, even a simple experiment or demonstration becomes very rich and encourages engagement and deeper understanding.
Step 7: Relevance is everything. Introduce new ideas just in time, when students can appreciate their immediate use and relevance. Don't front load things, introducing or reviewing skills long in advance. Learning is both contextual and time sensitive. Unless ideas are used right away and are regularly reinforced, they will quickly be forgotten. Also, it is not necessary to thoroughly cover a topic at the start. Instead, cover the parts that will be used and return to the topic later to revisit and expand it.
The instinct to be exhaustive is a powerful one amongst teachers. Resist the urge! What is most useful for students is what is relevant to the task at hand. A major problem is that often there is no task: the learning is being done in a scientific vacuum with no greater question being answered and no problem being solved. Make sure what you teach them is targeted to an immediate task - even “boring stuff” like the rules for naming compounds.
The seven steps I have described represented about a month of thinking time as I worked on the chemistry unit. It involved a lot of patient reading and thinking; there is no point in starting to write lessons until the big picture has been sketched out. So now that I have shared my initial planning steps, what did I figure out?
Part 2: Finding the Pieces of the Design
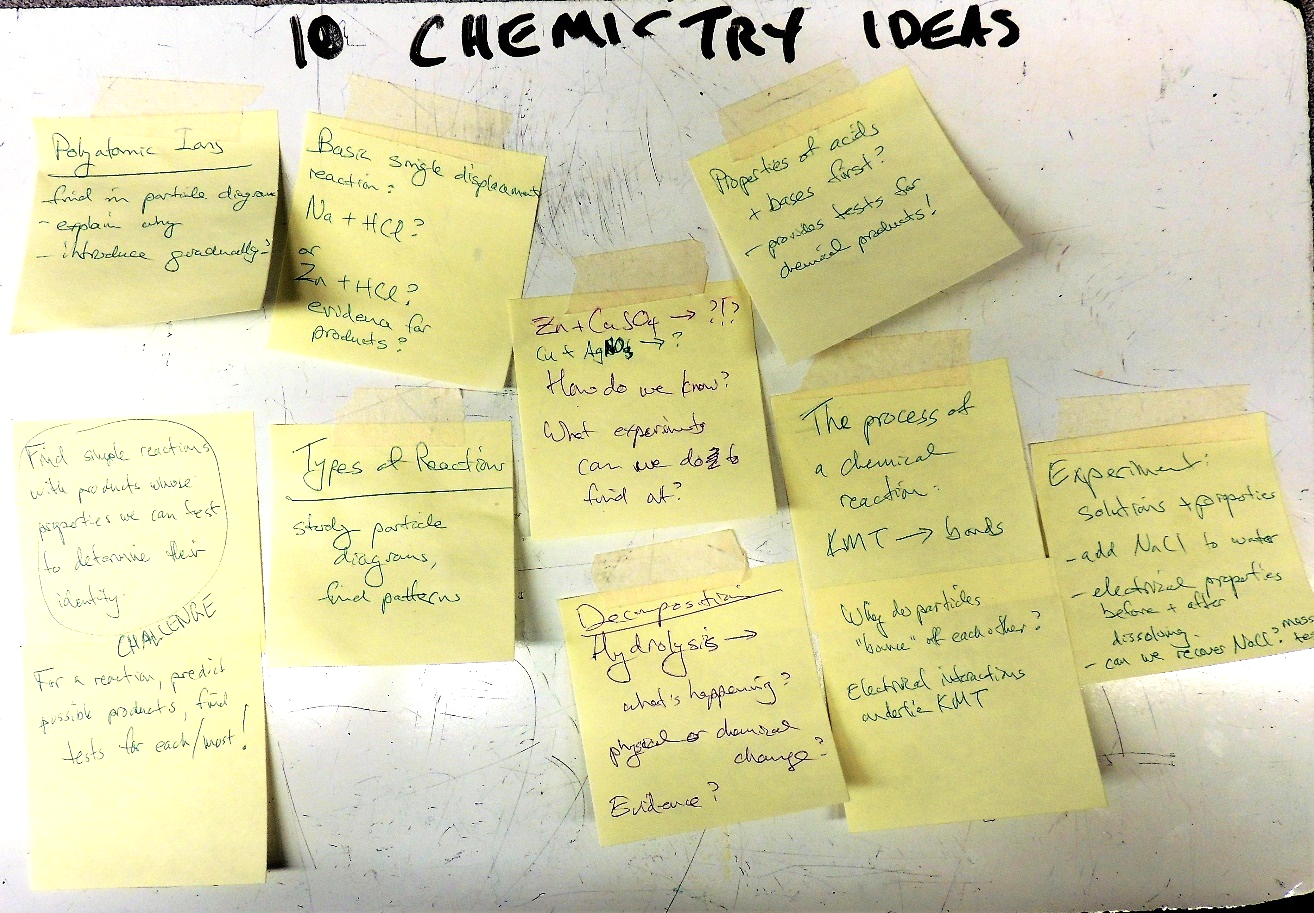
Searching for the atoms of learning What are the basic atoms or the core ideas to build the unit from? For other science topics, I could draw upon my teaching experience and science background. I would already have a good sense of an idea’s importance, its connections to others, and a good learning progression. With chemistry, this is not the case! I do know, however, what I don't want. I don't want a lesson sequence that goes: welcome to chemistry, naming rules, bonding, polyatomic ions, types of reactions. These topics are typically presented as a sequence of new skills without much context or rationale for learning and without much science! To come up with an alternative, I started collecting ideas:
Atoms of learning form molecules
Some of the ideas start to stick together and form molecules! A few themes begin to emerge, or if you will, precipitate out of the solution!
Evidence. Provide experimental evidence for the existence and identity of the products of a reaction. How did people originally figure out what results from a reaction?
Models. Connect new learning with particle models (pictures of shapes that represent the bulk atoms in a substance) and the kinetic molecular theory. The most important parts of chemistry happen invisibly or too-smallibly for us to see. We need to make chemical processes real by developing a visual, physical, microscopic, and scientific model for the reactions we are studying. This is the missing science I keep mentioning. Without this, students will have little idea what their new chemistry skills actually describe.
Skills. Introduce the new skills (Lewis diagrams, naming compounds, balancing equations, etc.) in incremental steps as they are needed by some context, rather than in one exhaustive lesson. This is the pedagogical technique of spiralling.
Find the key learning experiences The next step is to take these “molecules of learning” and form the key experiences students will have in the unit. I begin with five: an exploration of the electrolysis of water, dissolving zinc in an acid, figuring out what a solution is, burning magnesium, and a double displacement reaction. Here are some rough notes I put together for these experiences, which will likely become lessons. Note that I haven't yet figured out an appropriate lesson order or how to sequence the building of new skills. These are just rough ideas! And this is an essential feature of the design process: don’t worry about being “right” or complete at the start. Just get the ideas going and start to work with them! Here are the five key experiences:
What’s going on in a solution?
Much of the chemistry we study happens in solutions. Students must understand at a physical level what a solution is: what happens when something dissolves and how ions are produced.
Test the properties of salt and sugar solutions.
What evidence is there for dissociation into ions? Make conductivity measurements!
Testing experiment: is dissolving a chemical change or a physical change?
Dissolve the solute, then boil the solution until the water is gone and compare the mass before and after. It’s still there!
Draw particle diagrams for water, solute, and solution for both salt and sugar.
How does temperature affect the results? Draw connections with kinetic molecular theory.
Review valence and ionic bonding as part of this investigation.
Introduce Lewis diagrams as part of this investigation?
Possibly explore the movement of ions within the solution to show how the electric current or circuit is completed?
Single displacement reaction: Zinc and hydrochloric acid
Initial experiment: add hydrochloric acid to zinc, observe the reaction. There's a mystery to solve!
Predict the possible products.
Draw particle diagrams for zinc and the hydrochloric acid solution.
Testing experiments: generate ideas to test what products are present, look up properties of possible products.
There are bubbles! Capture the gas, do a burning splint test.
Does zinc react with water? Is there a noticeable reaction here?
How do we know zinc is combining with chlorine? Add small amounts of hydrochloric acid until the zinc is fully reacted. Heat the solution until the water is boiled away. Compare the mass of initial zinc with residue. What are the physical properties of zinc chloride? Look this up! How many chlorine atoms combine with each zinc atom? (Hopefully the mass of the residue is roughly double that of the original zinc.)
Draw particle diagrams for confirmed products.
Draw Lewis diagrams illustrating reaction. How did people figure out valences?! Figure out the valance of zinc!
Label type of reaction.
Decomposition reaction: Electrolysis experiment
Initial experiment: turn on current, observe what happens using a simple apparatus (plastic cup, thumb tacks, 9V battery, no gas collection tubes yet!).
Draw a particle diagram for a water sample.
We see bubbles! Is this a chemical or physical change? What tests could we perform?
Measure temperature near source of bubbles. Is the water boiling?
Collect the gases. Cool down gas and look for condensation — did we collect water vapour?
Observe volumes of gas. This must be explained.
Collect gases. Perform gas tests to identify.
Draw particle diagrams for the product gases.
Draw a particle diagram for the reaction: the challenge is to get the number of molecules correct.
Observe the volume of each gas produced. Explain!
Introduce the idea of balancing equations for reactions.
Draw Lewis diagrams.
Label the type of reaction.
Synthesis reaction: burning magnesium
Birthday party sparklers?
Burn magnesium, observe!
What component of the atmosphere is magnesium reacting with?
Predict possible products (MgO, Mg3N2) with molecular masses.
Collect ash, make mass measurements.
Determine formula for product.
Double displacement reaction: lead nitrate and potassium iodide
Pb(NO3)2 + 2KI → PbI2 + 2KNO3
Note that no gases are produced! This is evidence that the nitrogen and oxygen remain bonded. This motivates the idea of a polyatomic ion.
Playing with chemicals! Now that I have some ideas to work with, it's time to start playing with chemicals. I am not familiar with some of these reactions, so I need to spend some time trying them out and then decide how to integrate them into the lessons. I need to figure out which reactions will reliably provide the evidence we are looking for, which reactions students will be able to perform themselves, create “student-proof” procedures that they can follow, and safety procedures for them to practice. Based on my thoughts so far, a reaction like zinc with hydrochloric acid might need to be done three different ways to emphasize or allow different observations and measurements. Figuring this out will take some time! Weeks later, I decide:
What is a solution? The solution experiments work great! Lots for students to do. Solute = salt or sugar. Solvent = water or vegetable oil. It’s easy to observe the results using paperclips with a battery and lightbulb circuit.
Single displacement. The zinc and hydrochloric acid reaction is very time consuming. Apparently zinc chloride is hygroscopic and grabs water molecules from the air, making it very hard to eliminate the water and complete a mass measurement! We can get a good “pop” with a test tube and flaming splint - students will enjoy that. Zinc chloride is used in batteries and battery research is a hot topic.
Decomposition. The electrolysis works well. We will introduce a catalyst (NaOH) into student cups. The Brownlee apparatus works well using NaOH. It is really fast with NaHCO3 but also generates CO2. This could be a “green hydrogen” generation device for our fuel cell vehicles! Take that, Elon.
Synthesis. Too much smoke escapes when burning the magnesium! Good for dramatic effect, bad for science! Great for qualitative observations: the product is a white powder. I need to heat it in a covered crucible to slow down the reaction and contain the products. Then the mass measurements work!
Double displacement. Change of plan. We will start by dissolving AgNO3 in distilled water (it reacts with ions in tap water) and observe a clear solution, a current flow (ions), and no bubbles (no gas formed, the nitrate ion does not decompose). This is evidence for the existence of polyatomic ions! AgNO3 is used in indelible ink (to mark voters’ fingers). This could be an interesting theme.
I now have five interesting and rich experiences for students that I can build a unit around. But before I write an actual lesson, I need to work out the chemistry skills we will use as we explore these five phenomena.
Part 3: Designing a Progression of Concepts and Skills
The search for science continues Many units in the Ontario science curriculum are overflowing with expectations that need to be sifted through and weeded out, but this is not the case with the grade 10 chemistry unit! Here the amount of science is embarrassingly small. The unit mentions mechanical skills such as naming compounds and balancing equations but has very little to say about what students should understand about chemical processes. A younger colleague of mine recounted his own experience as a student learning grade 10 chemistry: he found it just like a French class, practising grammar and conjugating verbs. This is a common pitfall in science education: reducing the learning of science to a sterile exercise of manipulating information without much connection to the underlying physical world. So I have been searching for the science: the key pieces of understanding that students need to make sense of chemical reactions.
Particles and energy: the chocolate and peanut butter of chemistry There are few ideas more helpful for understanding our world than the particle model of matter and the flow of energy. Together, these ideas have tremendous explanatory power and can create useful conceptual models of wide-ranging physical phenomena across all grade levels. It is a serious weakness of the current Ontario secondary science curriculum that these ideas, and energy especially, are not explicitly involved in every grade level. (This is all the more ironic given that one of the curriculum strands is called “Matter and Energy”.) The new grade 9 curriculum did not fix this. It is a shame they did not learn from the American Next Generation Science Standards from 2013, which does not have this weakness. The topic of energy needs to be treated in a meaningful way in our junior science courses before the sciences split off in grade 11. In particular, the concept of bond energy is particularly fraught and students in senior biology can end up discussing ATP with no conceptual foundation for energy in biochemical processes. (ATP is the complex chemical adenosine triphosphate that is involved in energy transfers during cellular respiration, it is often described as having a “high-energy bond”.) This results in the incorrect understanding that chemical energy is stored “in a bond”. Including a focus on energy in grade 10 will be challenging because it is both subtle and is not an explicit curriculum expectation. Any new ideas we add to grade 10 chemistry must not overburden the unit, otherwise it won't help students and teachers won't use the lessons. Energy needs to be treated in a simple way while still having useful explanatory power.
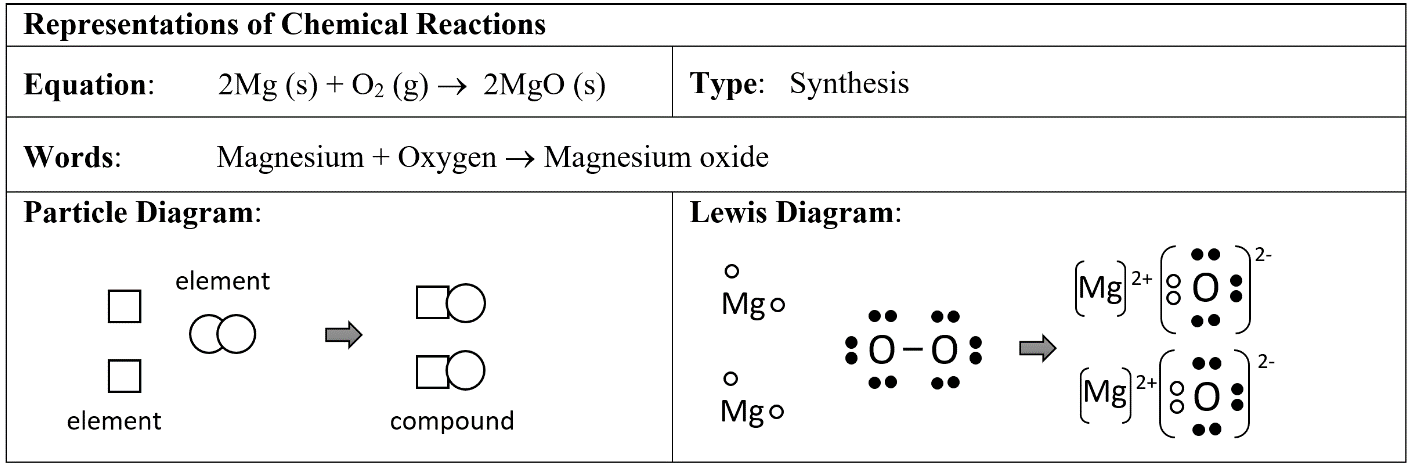
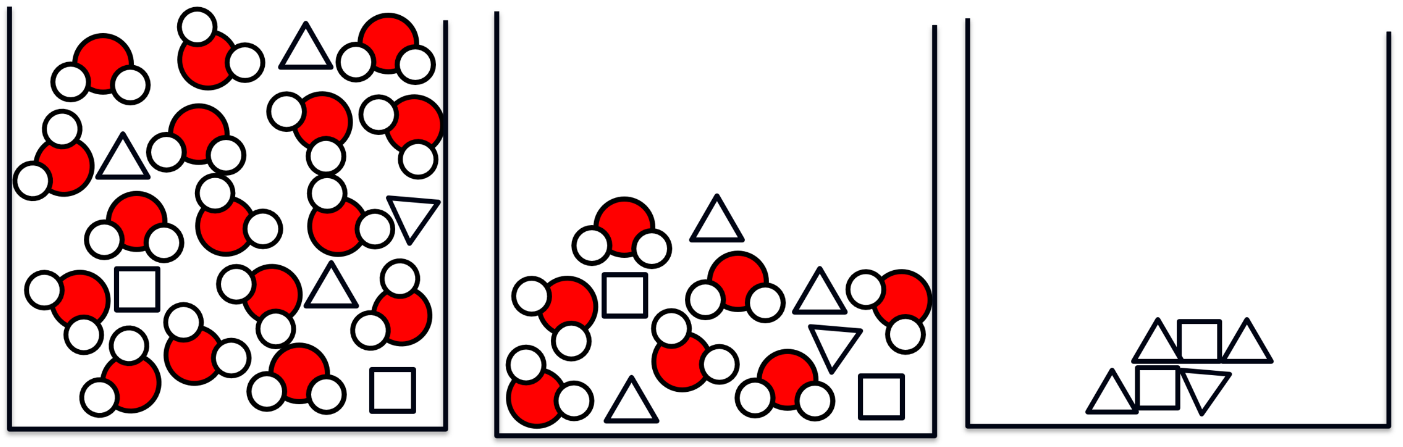
Taking pictures of chemistry Because of their value, I am choosing to emphasize particle and energy ideas throughout the grade 10 chemistry unit. The particle model will help students create pictures of chemical phenomena and energy concepts will bring them to life! Pictures help activate our brain’s visual processing centres, which are very powerful and help both struggling students, and students who memorize their learning without thinking. When we discuss a chemical reaction, my students should have a useful picture in their minds to work with. An emphasis on drawing particle pictures will force a lot of conceptual reconciliation and sensemaking: when we represent knowledge in multiple representations (pictures, words, equations) we are challenged to draw connections between the representations that make our understanding more secure. Here is my first attempt at what these multiple representations might look like:
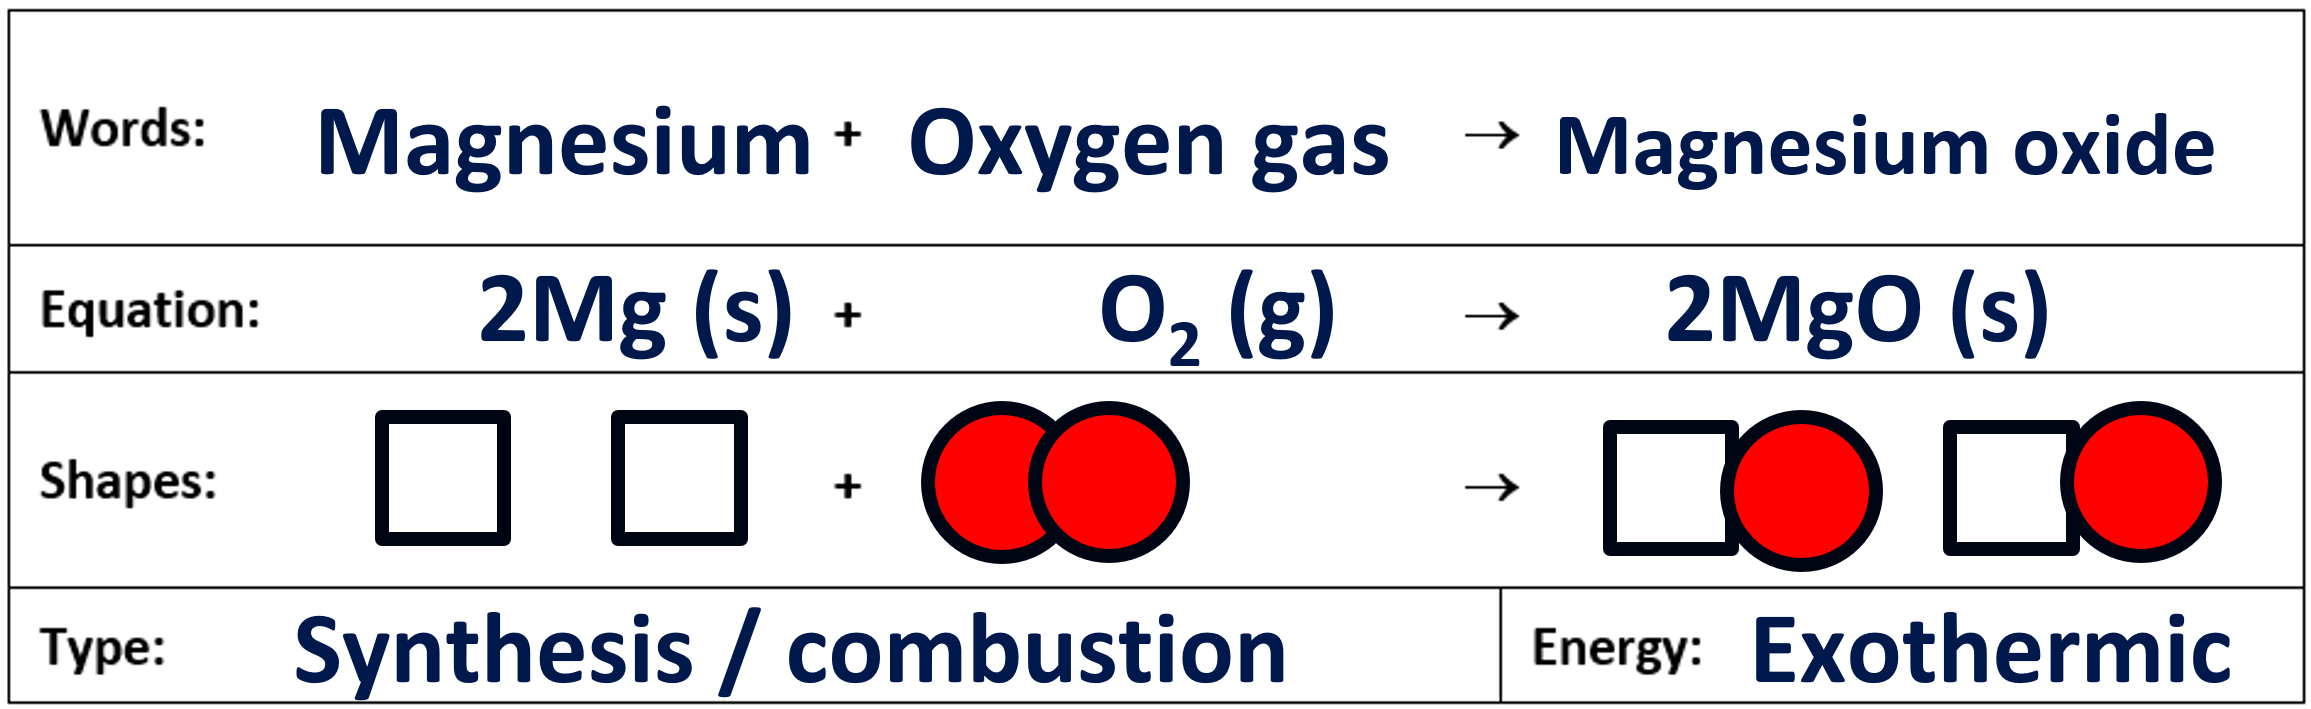
Let’s jump ahead in this story two years, after having taught the unit a few times and after many revisions. Here is our set of representations that we call the “reaction chart”. Take a moment to explore the ways in which it has been improved from the first attempt. There were many design iterations between the version above and what you see below. The rationale and experimenting behind the changes almost deserve their own article!
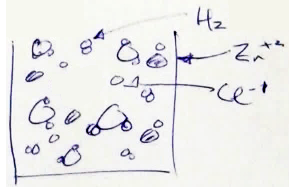
Our second visualization tool is the particle diagram, which represents the bulk matter. Here is an early attempt showing (sort of) the initial state of a zinc + hydrochloric acid reaction:
And here is what the particle diagrams look like two years later, showing the zinc chloride solution and solid zinc chloride after boiling the water away:
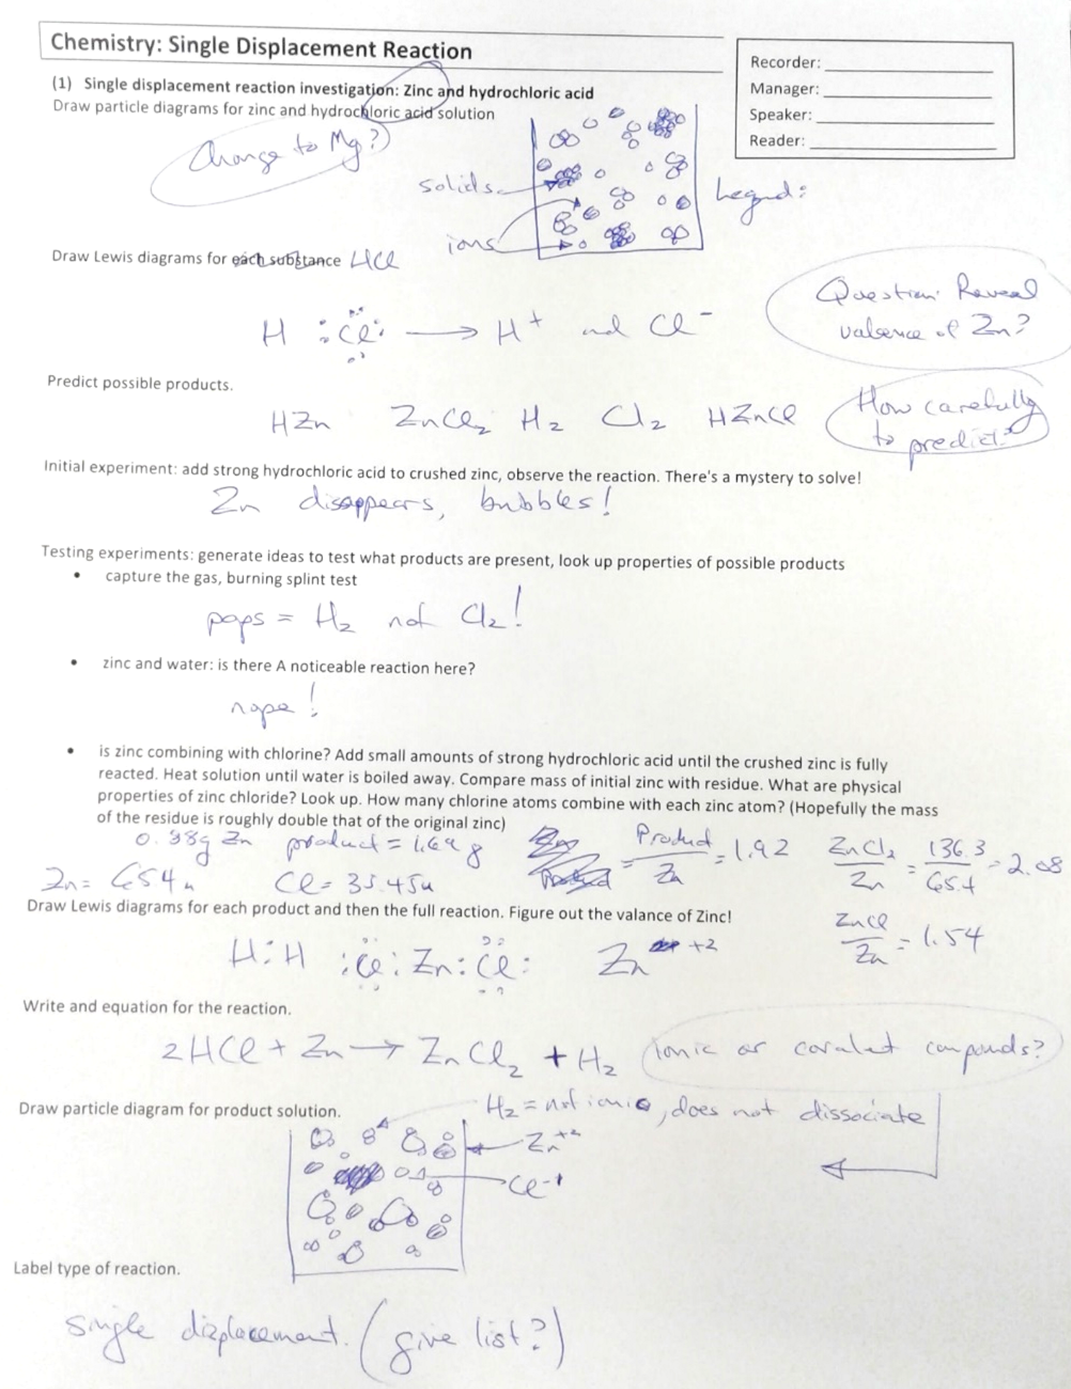
The skeleton lesson: a lesson run-through In part two of this article, I listed five important learning experiences that will become future lessons. At the time I originally wrote this, I had never taught these topics and didn’t have a good sense of the sequence in which to explore the ideas. To work this out, I developed each learning experience into a skeleton lesson: a very simplistic outline of a sequence of work and thinking. I call this a skeleton lesson because it is missing a lot of detail; it doesn't explain any of the new ideas or skills and it doesn't review any of the prerequisite ones. Then I worked through each skeleton lesson and carefully monitored the ideas and skills that I used. Take a look at this example, the single displacement skeleton lesson:
Here I noticed that I was balancing an equation and needed knowledge of ionic versus covalent compounds to draw the particle diagram for the solutions. (At the time I wrote this skeleton lesson, I didn’t realize that acids were covalent compounds… oops! And I wrote the ionic charges the sensible way rather than the proper way.) The skills I used were relatively simple, so this lesson could come early in the unit. (Chris from two years later says the skills are not so simple which is why this is lesson 9 of the unit). I also realized that predicting the possible products for the reaction would be tough for students. This will require some careful scaffolding to help students come up with reasonable predictions. I will also need to scaffold their work with molecular mass and mass ratios very carefully: I don't want to introduce moles and do full-blown stoichiometry, but I do want them to use some proportional reasoning to make predictions about the mass of the reaction products. Completing the skeleton lesson also gave me a sense that this learning experience will require two periods to complete.
Who's on first? What’s on second? It took me quite a while to figure out the sequence for the five learning experiences. This might seem obvious for an experienced chemistry teacher, but I found it challenging and went back and forth on many occasions. I now have a learning sequence for the unit with the addition of an energy lesson:
Review grade 9 elements/bonding
Collisions and Energy (thermal and chemical energy)
Single Displacement Reaction (transition metals, multivalent elements)
Double Displacement Reaction (polyatomic ions)
Bonus marks to the readers who noticed there are no mentions of acids, bases or combustion! We explore these in the context of ocean acidification and fossil fuel burning in our climate change unit. My next task is to tackle the lesson on energy. I need to do this first because it will establish the conceptual framework that we use through the rest of the unit. A few more weeks go by!
Part 4: A Careful Look at Particles and Energy I am not a chemist and did not study chemistry in university. As a result, I had a lot of learning to do! From the moment I started working on the grade 10 chemistry unit, I cracked the books to help improve my content knowledge and explore the pedagogical challenges of learning chemistry.
How deep should an explanation go? I was fortunate to participate in a webinar with the author and presenter of the Veritasium YouTube channel, Derek Muller. He made a comment that reassured me in my science writing habits: He said that to explain something well, especially a topic that you are less familiar with, you need to delve two levels deeper than what you will be explaining. He also mentioned that his projects keep him up at night as he sorts through the possibilities and ideas. Now I don't feel so crazy! In preparing to write the introductory chemistry lessons, I did a lot of textbook reading, especially concerning physical chemistry. (I was pleased to discover some overlap with a few of my university physics courses here. Yay physics!) I also explored the chemistry education literature to find out what pedagogical experts have to say about the challenges of learning energy within chemistry. Both avenues of reading were eye-opening. Every now and then, often as an aside, a textbook section would describe in detail the physical happenings of the particles that I needed to create a picture of what's going on. And I noticed how rare this was: the focus of higher-level chemistry work almost always shifts to mathematics and avoids conceptual pictures. I want to bring these pictures to life, so I will use simulations and try to simulate as much as possible. I was lucky to find some simple software to model chemical processes on an atomic level, molecular dynamics software. It is very important for conceptual development that students have reliable, visual models of chemical processes; beakers of solutions shouldn't be black boxes! (A “black box” is any device or process that people use but do not understand the inner workings of. We provide some inputs, get some outputs, and don't really know what happens in between. This seems to be the way most chemical reactions are presented at the high school, or even undergraduate level of study.) The pedagogical choice to emphasize particle pictures has required a surprising amount of background work, especially with acids! (Fun fact: the hydrogen ions released by acids can’t really exist on their own. Their charge density is so high, being a bare proton, that they are always attached to a water molecule.)
The problem of energy in chemistry education It turns out that the topic of energy in chemistry is fraught with challenge! As I learned more, I realized that I had to correct much of my own understanding. Back in my university days, I actually learned about Gibbs energy and Helmholtz energy: it turns out they are not just physics topics! But unfortunately, I didn't understand them at all. Not only that, I didn't properly understand how energy is related to bonding. There was an interesting mess of concepts in my head: my understanding of electrical or gravitational potential energy from physics, and an understanding of how energy is “stored in bonds”, especially “high-energy bonds” like those often discussed in biology. It took me quite a while to sort this mess out, so I have a hunch that I might not be the only one to experience these difficulties.
Energy is not “stored in bonds” Energy is worth taking a bit of time to discuss, because it is a fundamental concept to chemistry and biology. Let's think about photosynthesis, which is a bit of a black box for me — I haven't seen the Krebs cycle since high school! The inputs are sunlight, carbon dioxide, and water, and the outputs are oxygen and glucose. I have heard it described that the Sun’s energy is now “stored in the bonds” of the glucose molecule; I have a hunch this is how most students (and teachers?) would describe it as well. The problem is that bonds don't store energy. At its most basic level, we need to add energy to a system to separate attracting particles, that is, to break bonds. When a bond forms, energy stored in the electrical interaction between particles becomes the kinetic energy of the particles, in physics speak. Or, in the chemical vernacular, chemical energy transfers to thermal energy when a bond forms. Here is video I made showing a simulation of bond formation and the increasing kinetic energy. We can see how the particles are moving faster after the bonds are formed. Thermal (kinetic) energy has increased while chemical energy (energy stored in the electrical field) has decreased. Bonds don’t store energy!
Here is an analogy with gravitational energy that might be helpful. Suppose we have two jackets side by side, hanging from one hook. Since they are on the same hook, they are pretty close to one another, so we consider them to be bonded. Then we take one jacket, lift it up, and put it on a higher hook with a third jacket. These two jackets are very close, so we consider them to be bonded. Energy was stored in the process of lifting up the jacket and is not stored in the hook (the bond) - it’s just a hook! In this analogy, the energy is stored in the gravitational field while the hooks simply hold the jackets in their positions within the gravitational field.
Energy is stored in the configuration of particles An additional challenge for an analogy like the jacket and hooks is that in an actual chemical system, the gravitational field is an electrical field, and the hooks are also electrical fields! When a bond breaks, the sundered particles would just return back together unless they get “hooked” to other particles (or escape to infinity). As this analogy illustrates, there is no energy stored “in the bond”. A configuration of charged particles (particles bonded in a particular way) can have an energy stored electrically relative to a different configuration of charged particles (particles bonded in a different way). When we refer to a “high-energy bond”, we must not leave the impression that the energy is stored in the bond. Instead, a high-energy bond consists of a collection of particles that have a lot of energy stored in the electric field due to their fairly expansive configuration relative to a more compact configuration, very roughly speaking. It might be better to say, “the particles are bonded in a high-energy state” rather than “the particles are in a high-energy bond”. Language is a major impediment here. We don’t have succinct phrases that can compete with “high-energy bond” or “stored in the bond”.
High and low energy states This is not simple, or easy to describe or conceptualize. But if we give students the wrong impression, as is often the case, they will believe incorrectly that a bond is high-energy because energy has been somehow “poured into” that bond. As a result, they will have conflicting conceptual models for energy in their chemistry and physics classes. Returning to the photosynthesis example, the bonds found in water and carbon dioxide are strong and stable, with particles in a low energy state (this configuration of hydrogen, oxygen, and carbon atoms has a smaller amount of energy stored electrically relative to glucose). The Sun's energy is needed to break these strong bonds and create the less stable bonds found in glucose that hook the particles to a higher energy state relative to those of water and carbon dioxide. The configuration of glucose and oxygen molecules has more energy stored electrically relative to the other configuration. The fact that the particles are hooked into a higher energy state means that there is a lot of energy that can transfer from the electric field to do all sorts of cool stuff with ATP, before particles return to the lower energy state in the configuration of water and carbon dioxide molecules.
This whole discussion of energy is a good example of Derek Muller’s observation that we need to dive much deeper to reliably explain something at a simpler level. For a grade 10 unit on chemistry, where energy is not even part of the curriculum, we have to distill these energy concepts to their essence and find simple strategies to use them in meaningful ways.
The world is not full of free atoms My experience teaching the grade 9 chemistry unit has encouraged in my mind some faulty understandings. In our simple grade 9 introduction to ionic and covalent bonding, we imagine taking two atoms of different elements, combining them, and voila, a bond! In a conceptual model such as this, with no consideration of energy, bonding should always take place; a sodium atom should always bond with a chlorine atom. This is not quite the case, and it creates an obstacle to a more sophisticated understanding. A chemical reaction, or chemical change in our grade 9 focus, doesn’t happen in the abstract and contextually empty way it is often described. The world in which we actually live in consists almost entirely of pre-bonded atoms! We really don’t find single sodium and chlorine atoms just kicking around, waiting for something to do. The way I introduce bonding in grade 9 does encourage this faulty impression, and the fact that we don't discuss metallic bonding leaves the atoms of many elements roaming free, despite being a solid chunk of metal! Furthermore, since pretty much all atoms start off bonded, a chemical reaction can only begin with an input of energy and the breaking of bonds, not the making of bonds. Perhaps we should teach bond breaking before making! (Bonus marks to the reader: which video in this article shares this slightly deceptive world view?)
Our starting point for exploring energy My new grade 10 chemistry unit begins with a review of grade 9 ideas and the periodic table. The second lesson gets right to the heart of energy in chemical processes. We begin by observing the reaction of calcium in water, using a beaker of cold water and a beaker of hot water. Here is one of the videos that I created for this lesson:
It is our job as scientists to explain what we observe! Our tools for doing this are particle pictures and energy. What do we get when we combine particle pictures with energy? Collisions! Chemistry is all about collisions between tiny, charged particles, and the energy changes that result. The whole unit that I am designing will have a strong physical chemistry flavor because of this basic fact and our choice of tools. When we provide conceptual tools to our students, they can begin asking meaningful questions. The key question here is: why is the reaction in the hot water faster?
Chemistry is collisions There must be a minimum speed or energy for water molecules to cause the reaction. This is the case because the calcium atoms start off bonded together (a very important fact)! How does a water molecule interact with the calcium atoms? Through collisions! Water molecules must collide with enough energy to break the bonds between calcium atoms. Fewer water molecules in the cold sample can do this; they do not have enough thermal energy to “pay” for this. We can think of thermal energy like a currency that atoms use to pay for bond breaking. To help visualise this, I created a molecular dynamics simulation of calcium in water. Note that this simulation does not show the product forming, just the collisions and bond breaking that starts the reaction.
Why does the temperature of the system increase? Further observations using a temperature probe show the temperature of the chemical system increasing while the beaker turns white and cloudy. Here is evidence that a chemical change is taking place with a new compound forming. This requires the creation of new bonds, and results in the thermal energy of the system increasing. Where did this energy come from? It was stored in the electrical interactions (in the higher energy state) between the particles, energy which we will call chemical energy.
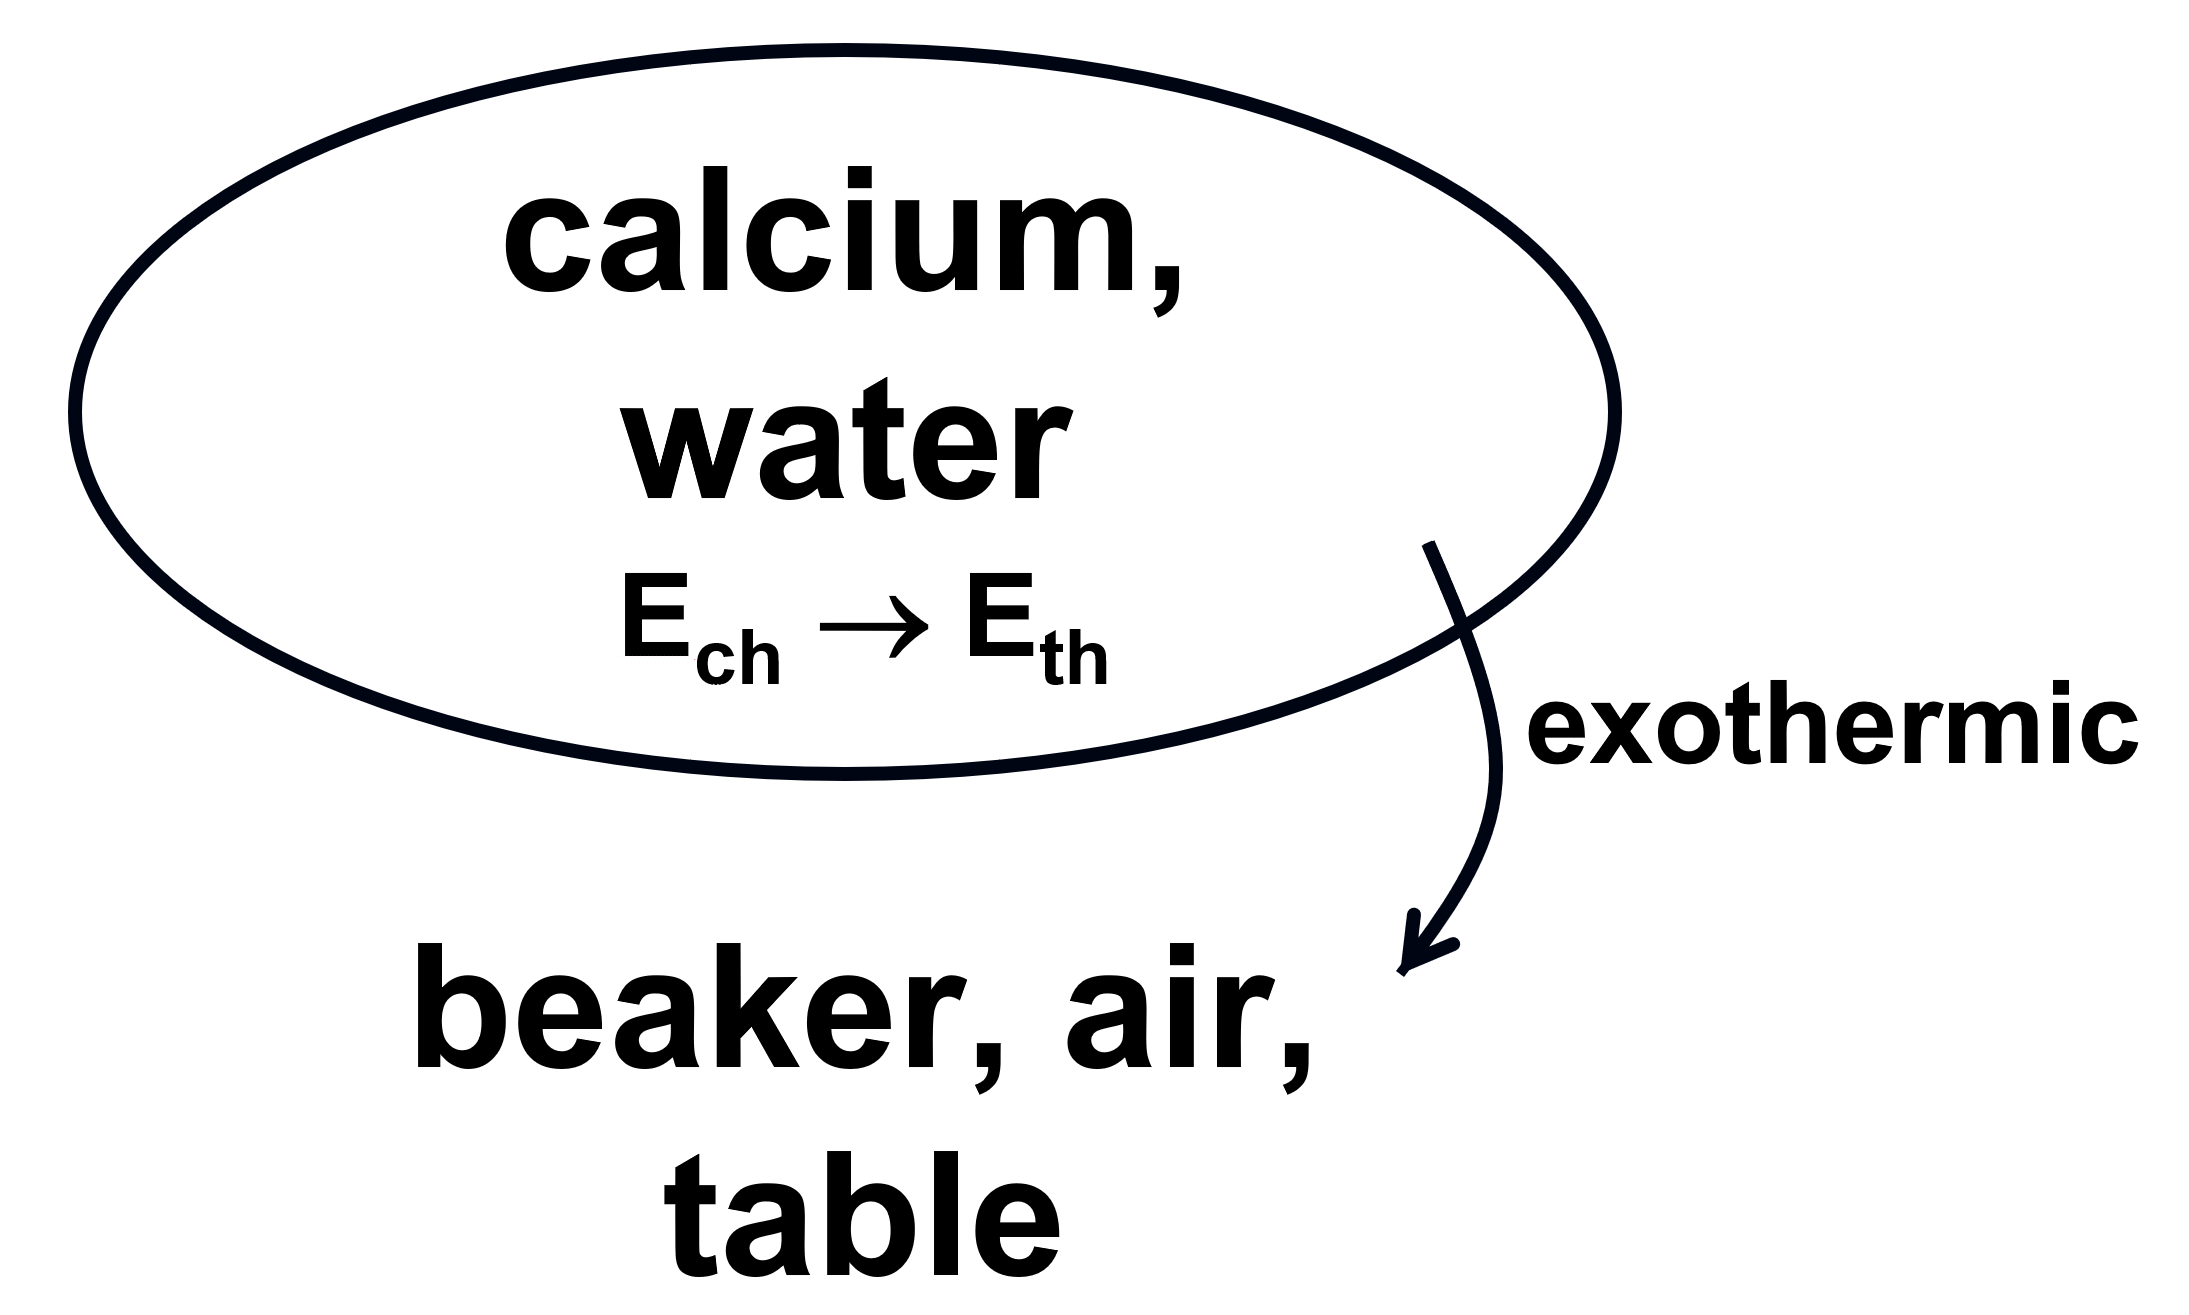
Electrical interactions and changes in energy When we dive deep into the particle processes at work during a chemical reaction, we find multiple steps involving the breaking and making of bonds and transfers of energy. This is complex; we want to dodge this bullet in grade 10. Luckily, if we step back from these details and focus on the chemical system as a whole, the energy picture becomes simpler. As a result of all the bond breaking and making, does the thermal energy of the system increase or decrease? If it increased, the chemical energy must have decreased; and if the thermal energy decreased, the chemical energy must have increased. With simple observations, we can think about changes to the internal energy of the system. We describe this using an energy flow diagram, borrowed from grade 11 physics:
But wait a minute! Our chemical system is not isolated from the rest of the world. It is initially the same temperature as its environment, but as the reaction takes place the system becomes warmer. This causes an energy flow: the glass of the beaker and the air surrounding it start to warm up. Energy is now flowing from the system to the environment. This is our first example of an exothermic reaction. It's actually pretty cool that we can infer what is happening to the bonds of microscopic particles just by comparing two thermometers!
This constitutes the conceptual framework for our grade 10 unit on chemistry, which hopefully provides useful tools that will allow students to model and understand the chemical processes they explore. The calcium observations described above are also a good example of how we use observations to drive our learning and lesson flow.
So, how is it going? Two years after I started writing this, I am continuing to refine our energy approaches. Overall, I am very happy with it, especially the idea of thermal energy being “paid” to break bonds: the stronger the bond, the greater the payment required. This has been really helpful when discussing dissolving, the formation of a precipitate, and in our climate change unit where we explore the effect of acidic ocean water on the shells of oysters. I am still wrestling with the term “chemical energy” - defining it at a grade 10 level is extremely hard. The phenomenon of activation energy also clouds the simple distinction between exothermic and endothermic reactions. There is always more to sort out!
How does this work in practice? And there is always more to learn! Read the second half of this article where we explore one lesson in detail and see how all the pedagogical pieces have fit together.