What happens when you let a physicist teach biology? This is the second part of an article where I explore the design of a biology unit for grade 10 science. You can find the first part here. The big design ideas are these: use observations and questions to drive our inquiry narrative, observe realistic evidence just like historical scientists, allow students to explore and find patterns before teaching the names of things, and use the science of learning to improve the “stickiness” of the ideas in students’ minds. The previous article left off with an examination of how our brains structure knowledge as webs of connections, and the process of learning as an attempt to make connections between new and old knowledge networks. Now we are ready to summarize what teaching really is!
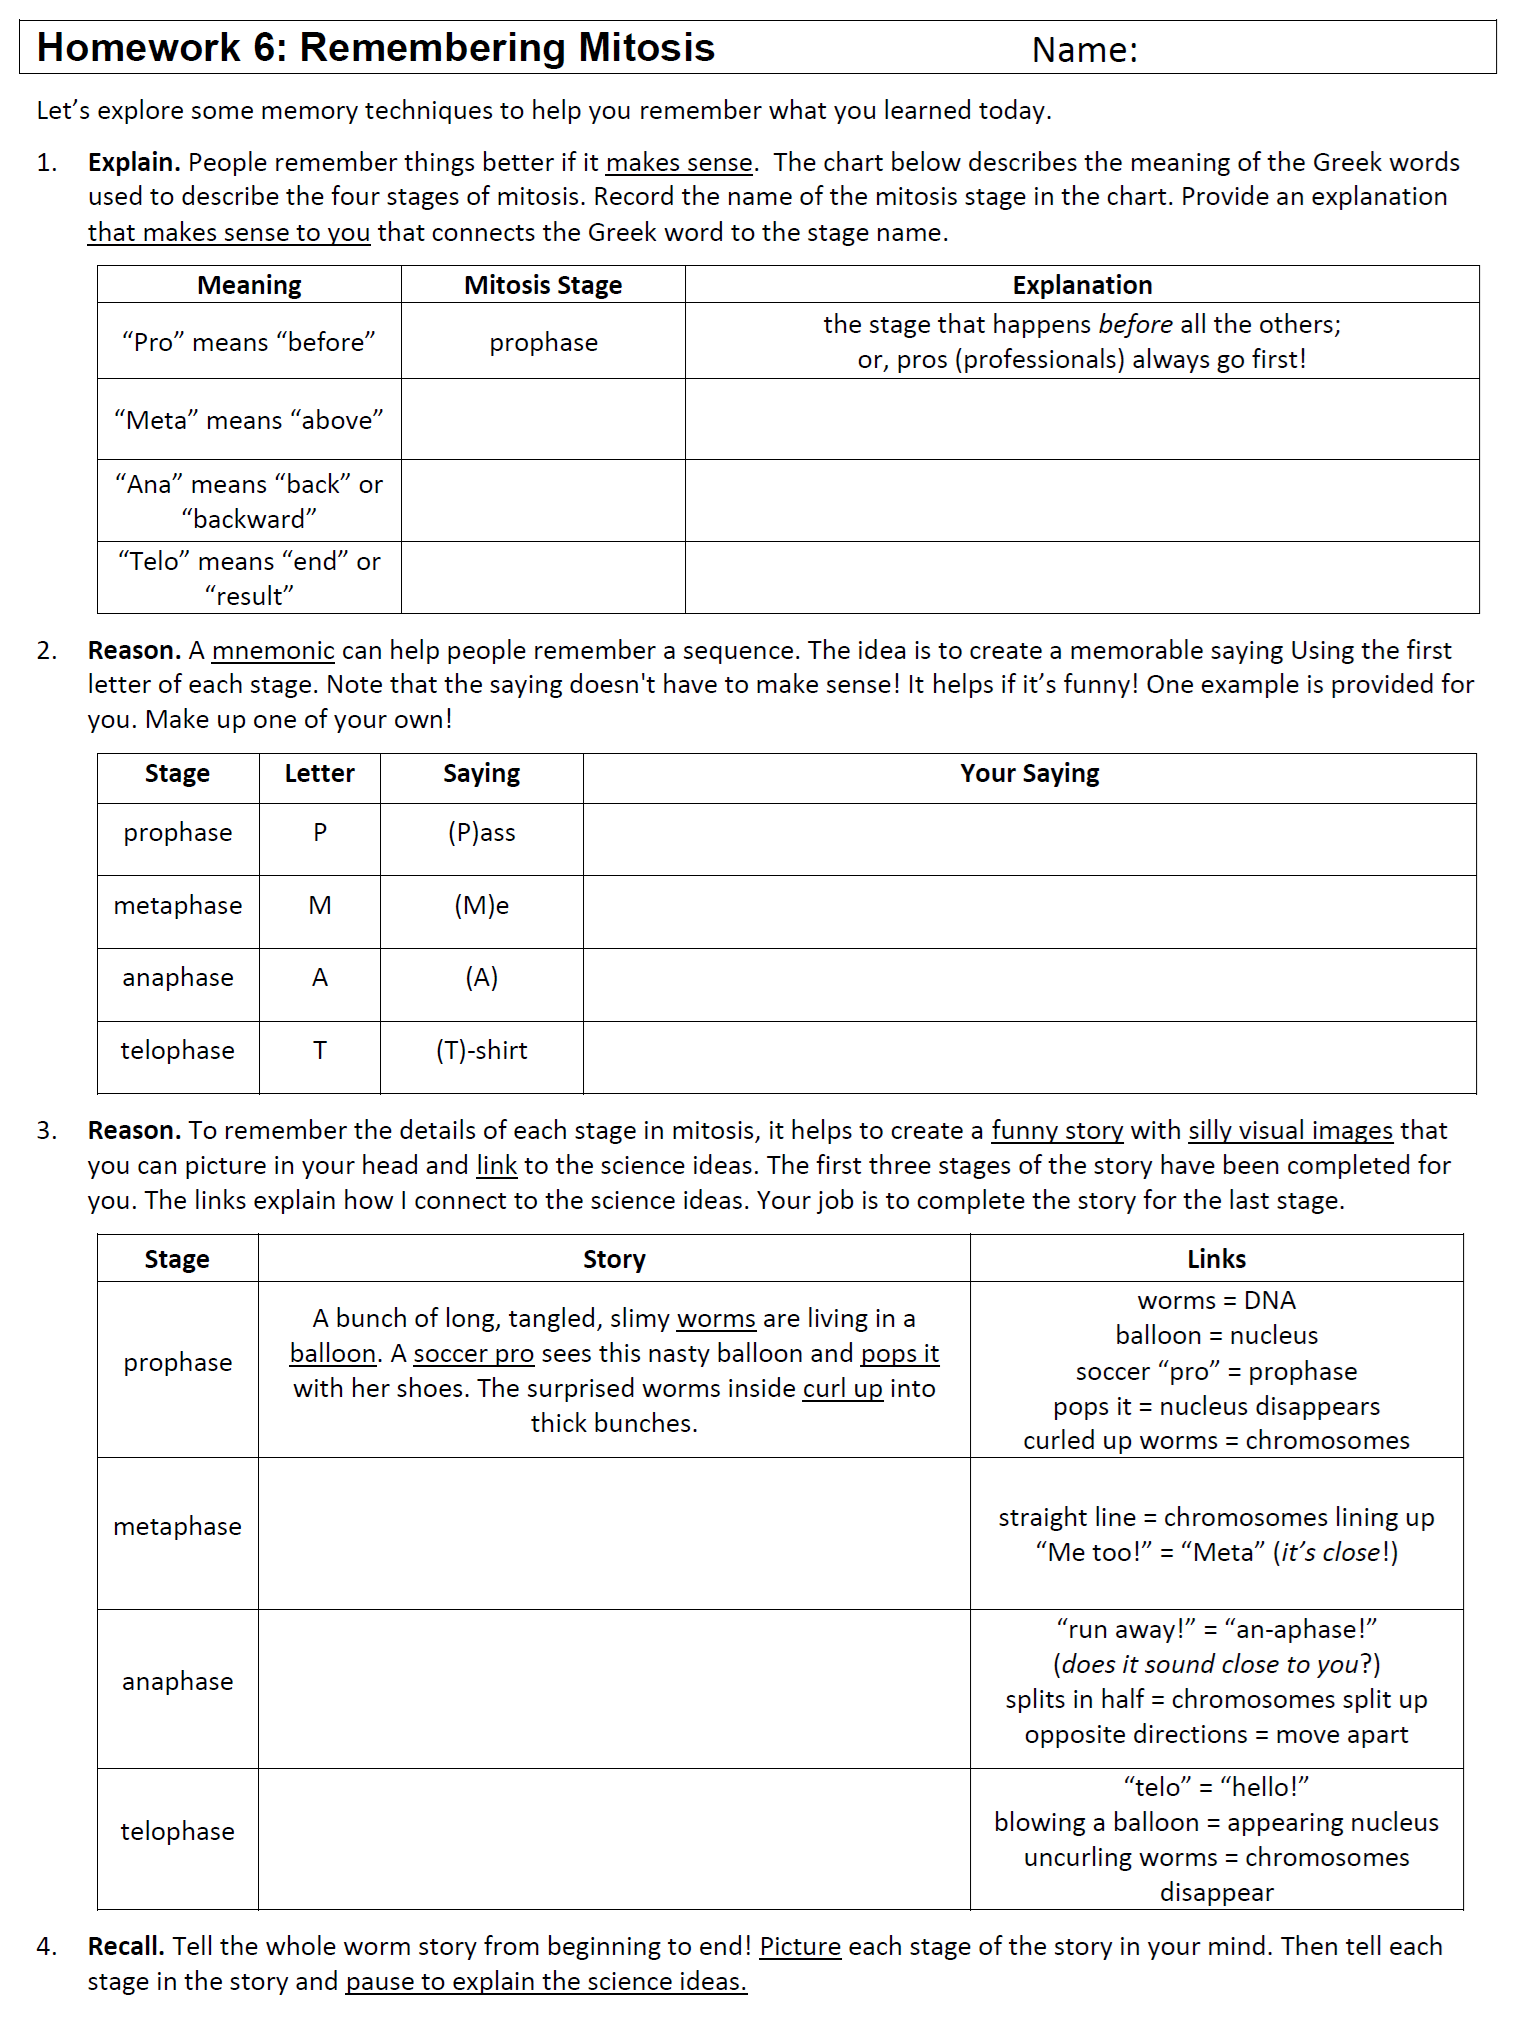
Encoding and recalling learning On a biological level, here is how our job of teaching works: (1) help students encode learning (memories) in rich, robust networks; (2) reinforce the networks through recall and further connections. Every time we access a memory, the strength of the neural connections (the number of dendrites, the number of synapses, or the efficiency of the neural operations) improves. Even carefully encoded memories need recall practice in both familiar and new contexts across a long time interval. (An interesting side note: memory encoding is much stronger when strong emotions are associated with the learning experience. Teachers routinely underestimate the role of emotion as a critical ingredient in any lesson plan!) We practice memory recall at the start of many classes, we introduce memorization strategies in the homework for mitosis, and we turn our learning logs into flash cards of organ systems.
Since remembering biology terminology is so important, we need to explicitly train students how to learn and remember. I am very strategic in what I ask them to memorize (only the organelles that we refer to in lessons, only the cell types we routinely see, only the organ functions that fit into our conceptual focus) and when we memorize it (only after exploration and preparation).
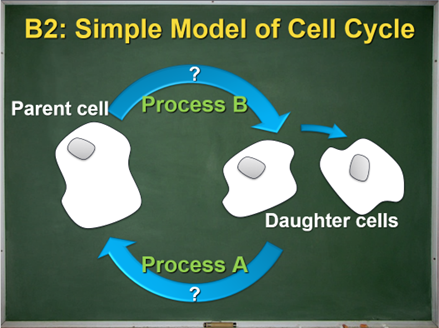
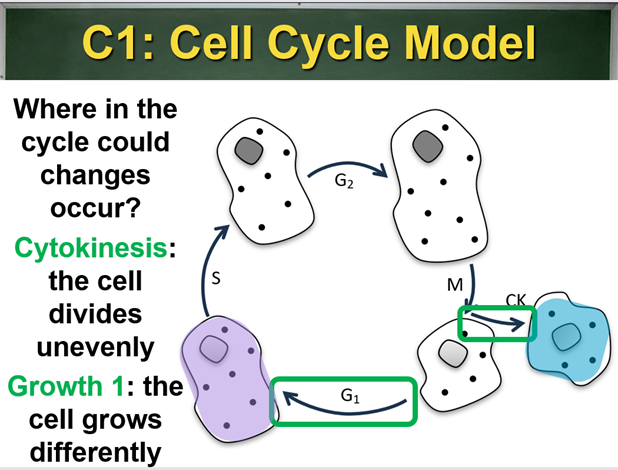
Building biological models: Lesson 7 An important pedagogical process that we go through in our grade 10 course is model building. Our scientific models are packages of concepts and ideas that we use to explain and predict. In our optics unit, we build a conceptual model explaining how we see; in climate change, it’s a model showing how the Sun warms Earth; and in the biology unit, we model the life cycle of a cell, known to biological folk as the cell cycle. All our models start off very simple, and as we observe, discover, and learn, we add to the models. This pedagogical process encapsulates the process of science quite nicely: when exploring new phenomena, scientists start very simply and add more detail and complexity as they go. Simple observations of single-celled critters (called protists in the business) start us off: they grow, do their thing for a while, and then divide.
The neat thing is that this super-simple cycle has been studied, and different proteins are activated in each stage:
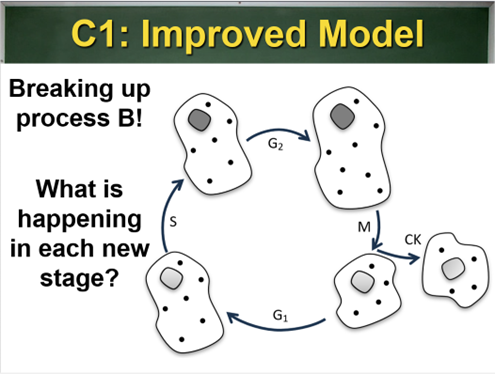
As we turn our attention to what is happening inside the cell, we are motivated to add more detail:
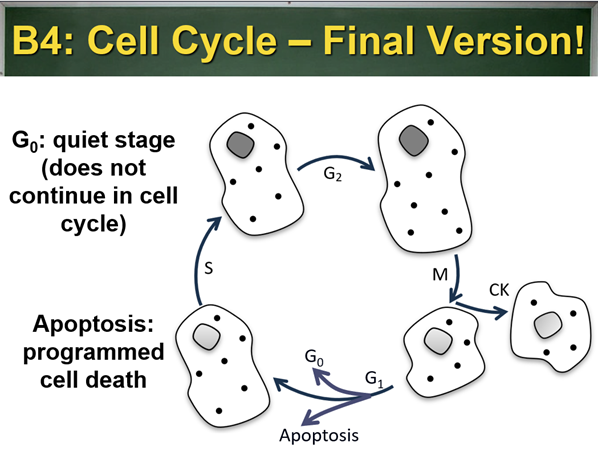
In later lessons, we will add more detail! Now in Lesson 7, we have a decent model that is able to explain and predict (the gold-standard of scientific models): the daughter cells are identical to the parent cells, which is what we expect for protists. The development of the cell cycle model allows us to tie a nice bow around our two rival growth hypotheses: size and number. Do organisms grow because of changes in cell size? They sure do, but the size differences are not huge because they are only splitting in half. Do organisms grow because of the changing number of cells? They sure do! So both hypotheses have an important explanatory role in our model. Is this the end of the story? Certainly not! Scientists like to push and test their models in new situations, find their limitations, and build on to them. This is what we will do next lesson!
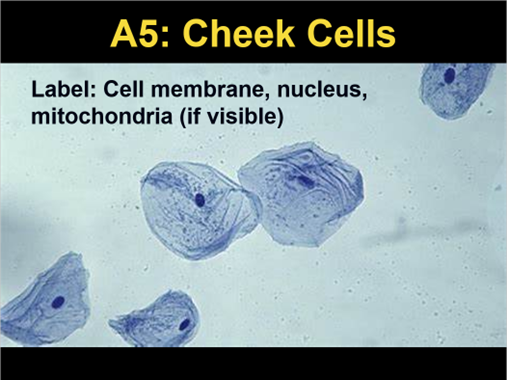
Your development: Lesson 8 We are now ready to explore the development of complex organisms like you and me. Speaking of which, here I am:
These are my cheek cells — you can tell because they really like teaching science. After we observe our cheek cells using the microscope, it doesn’t take too long to find a problem with our cell cycle model: we are more than a mass of cheek cells! We are a collection of different cells, but where do these differences come from?
Pass the tissue It is important to me that students look at real things, directly in their microscopes or in images that professionals would use. I try to avoid pleasantly simplified textbook images or schematic diagrams of things. We want to begin by observing reality and then abstracting and simplifying! An amazing resource that I use for the remainder of the unit is the website histologyguide.org. I have spent hours on this site just exploring — it’s so fascinating, maybe because it shows the most basic engineering of the body. When I told my colleagues that I was doing histology, the study of tissues, with my grade 10s, they thought I was crazy. This was their least favourite and most boring course from university! Let’s take a look at where those cheek cells come from using a biopsy: Hard Palate | Gastrointestinal Tract.
(used with permission from the authors: "www.HistologyGuide.com, T. Clark Brelje and Robert L. Sorenson, University of Minnesota, Minneapolis, MN")
Can you see the gradual changes in the cells? In some places there are sudden differences. We need to improve our cell cycle model to include processes where cells can change or differentiate.
This process of model revision and improvement allows us to visit the cell cycle in many different lessons, which reinforces its importance and stickiness in students’ minds. It takes a while to get to the “full” cell cycle, so students are not overwhelmed with a huge amount of information at the start. This is how science works — advancing in small steps, bit by bit. Jumping to the conclusion ruins the story arc, the narrative of inquiry that we build with our students. Most of us don’t want to know the ending unless we follow the full development of the story. This is how people work and how learning works best.
Now that we have the concept of cell differentiation, we have the key that unlocks the door to the rest of the unit. We are ready to explore a developmental process that starts with a single cell, and follows cell division and cell differentiation to the growth of tissues, organs, organ systems, and entire complex organisms.
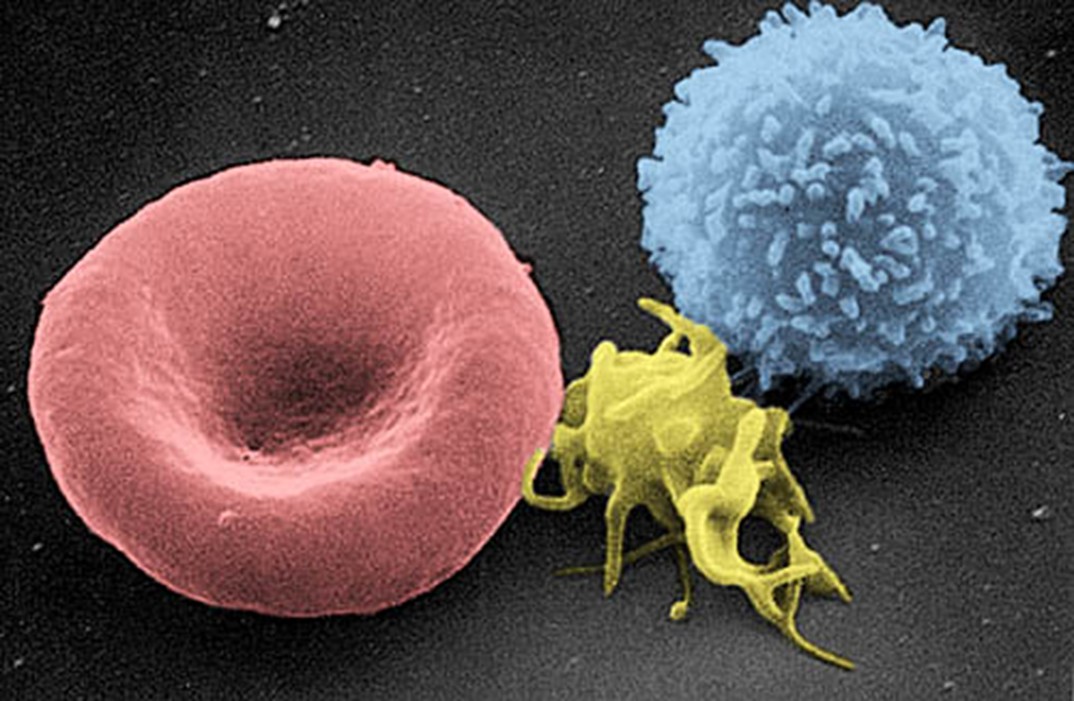
Exploring your cells: Lesson 9 Somewhere around our fourth day of existence, we grew tired of being a mass of undifferentiated cells — so monotonous! We began differentiating and haven’t looked back since. We are composed of a great variety of cells with lots of interesting jobs. This is traditionally taught as a list of types and functions, a lot of disjunct information. How do we cover this in a pedagogically meaningful way? Think about how people figured this stuff out. There was a first time when people put blood under a microscope:
Did they have any idea of what they were seeing? There are round blobs, little dots, and strange purplish cells. How did people start to figure out what the different cells do? Well, they looked for clues starting with shape. This brings us back to the powerful biological concept of form and function. The red blob cells don’t have a nucleus and are flat and smooth. Interesting! For each cell type, I give students a histology image (stained in a particular way that they learn to identify) and an electron microscope image:
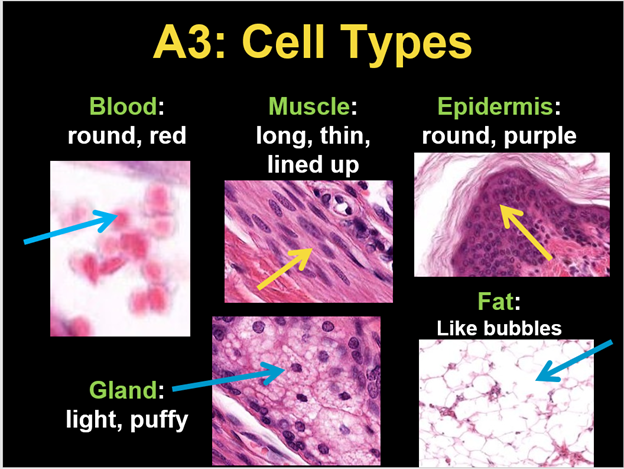
After examining cell shapes, we try to solve a puzzle: I ask them to match the cell shapes with a list of functions. This forces students to focus on form before being exposed to detailed information. Then they are challenged to use their observations and make connections with function. They enjoy this. Out of the nine cell types we look at here, we focus on five: muscle cells, red blood cells, gland cells, fat cells, and epidermis cells. The students will actually get quite good at recognizing these cells in histology samples and can use them to figure out a lot about tissue and organ function. Here is another pedagogical point: We often describe the great importance of scientific knowledge but then drop the topic like a hot potato and move on. In our approach here, we introduce fewer ideas and use them routinely to explore and explain. This makes learning meaningful and sticky, and it’s a feature I hope you notice throughout these lessons.
(images used with permission from the authors: "www.HistologyGuide.com, T. Clark Brelje and Robert L. Sorenson, University of Minnesota, Minneapolis, MN")
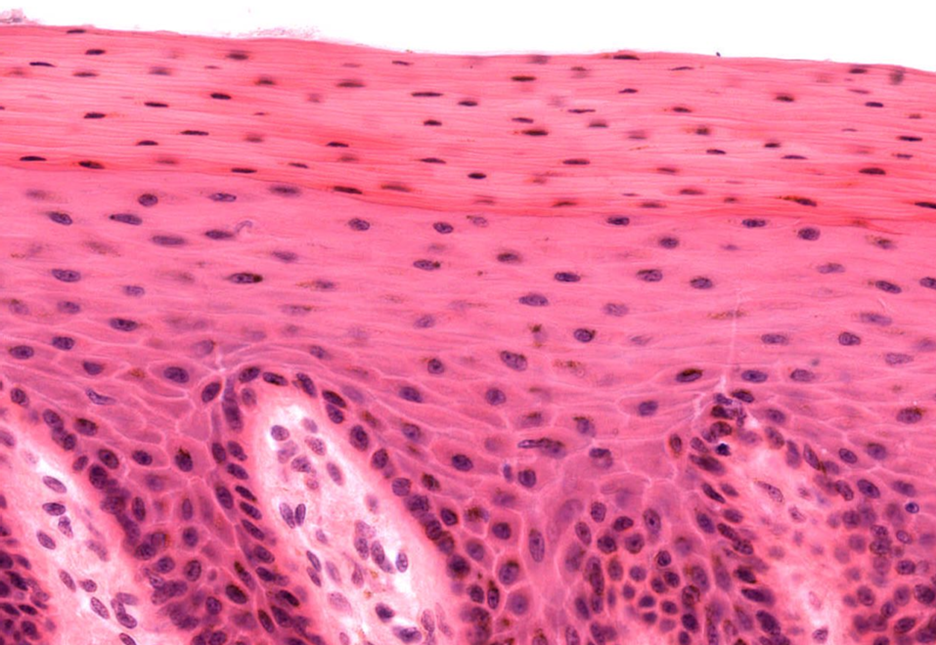
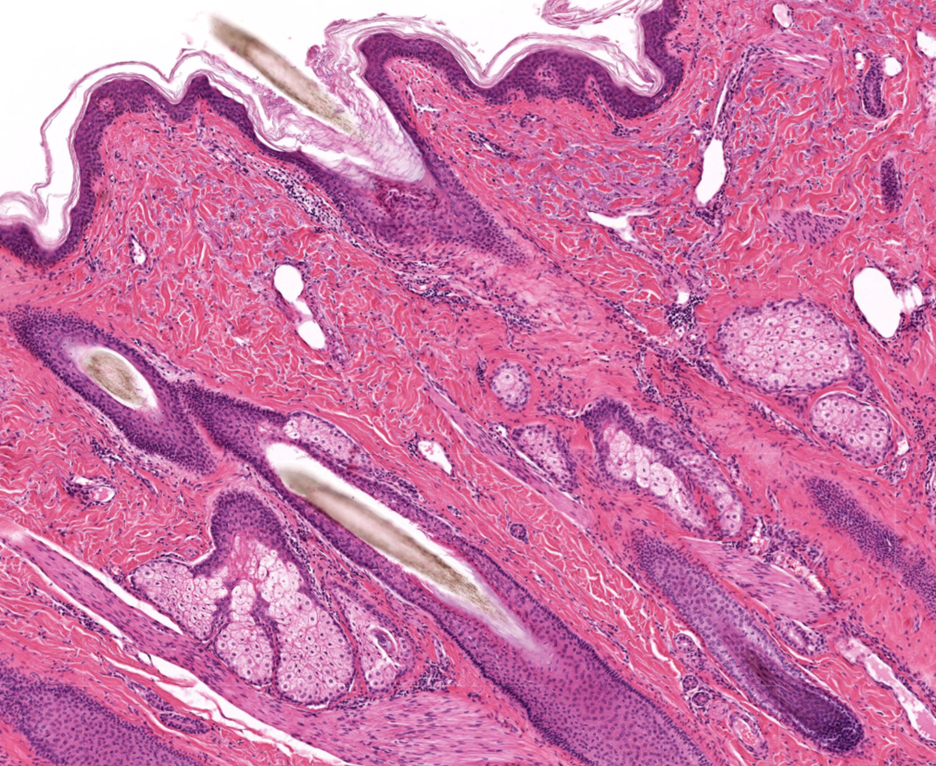
Getting under your skin: Lesson 10 We have been working our way up the ladder of biological organization from cells to tissues and now to organs. In our tenth lesson, we explore the organ that you and I have scrutinized the most: the skin.
(used with permission from the authors: "www.HistologyGuide.com, T. Clark Brelje and Robert L. Sorenson, University of Minnesota, Minneapolis, MN")
Time for some of that sticky learning! In this image of the skin, students practice identifying the key cell types that we focus on: epidermis, muscle, blood, gland, fat. The image serves as a visual definition of an organ: tissues of different types working together for a common purpose. Students can quickly relate structures within the skin to functions: the sweat and sebum glands, the muscle attached to hair follicles, the dried outer layer of epidermis cells. And then there are the injuries! The healing of wounds to the skin is absolutely fascinating. It turns out there are stem cells living near the base of hair follicles, which swing into action when they receive chemical signals from a nearby injury. This whole article is quite amazing: Wound Healing: A Cellular Perspective — PMC. So this becomes our introduction to stems cells, which we connect back to the cell cycle. And students have lots of first-hand experience with wound healing, from bleeding to the scabs, to picking scabs and noticing the pink puffy, temporary, undifferentiated skin cells underneath. There are also lots of interesting connections to research:
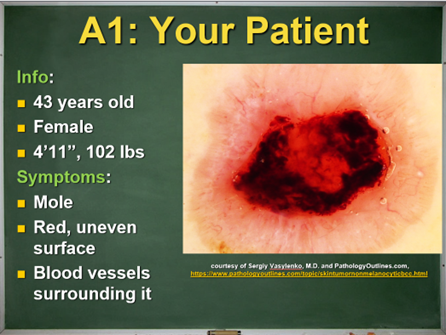
Growth gone wrong: Lesson 11 Starting with this lesson, we begin medical roleplaying as we examine case studies. I do this for three reasons: it helps to motivate the learning and make it engaging; it helps students understand the thinking process of medical professionals; and it encourages students to think of themselves in the professional role. Remember that this unit represents the last formal learning about human biology for students who do not continue with high school biology. This, and Dr. Google, represent the knowledge base our students will have to navigate the medical issues they will encounter in their lives. And so, we begin the role playing:
Congratulations! You have completed high school, university, and medical school and are now a family doctor. Your very first patient arrives and you take her medical information — she is concerned about a mole on her neck.
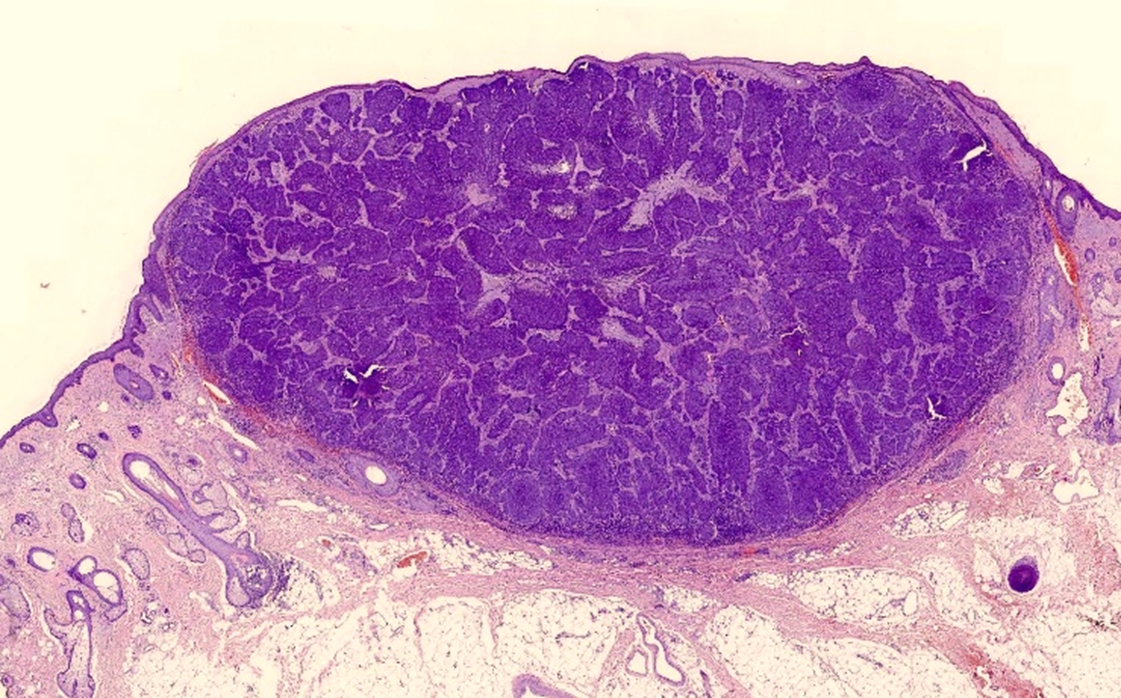
You remember back to high school when you first started learning about cell growth and the skin. Compared with normal skin, which we examined in the previous lesson, students can see that there are way more epidermis cells than there should be. Where does this problem come from? From the cell cycle! We are now ready to put the final touches on our grade 10-level model of the cell cycle.
When the cell cycle is traditionally taught, it is presented with a lot of information about each stage. In this unit, we start with a very simple cycle and keep adding to it. This better represents how science develops and allows us to provide a rationale for each new idea we add. This helps the learning to stick!
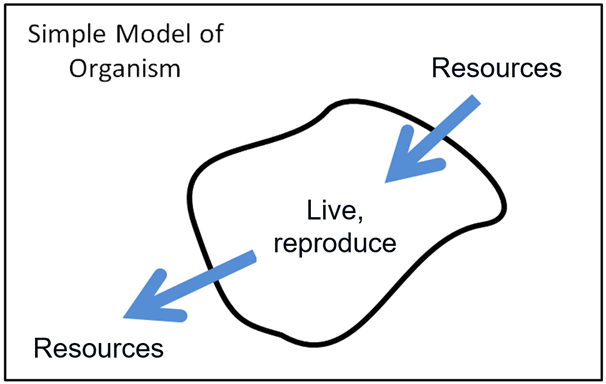
Staying Alive: Lesson 12 Physicists like to create very simple models of complex systems as we work out their basic features. So here is my model of life:
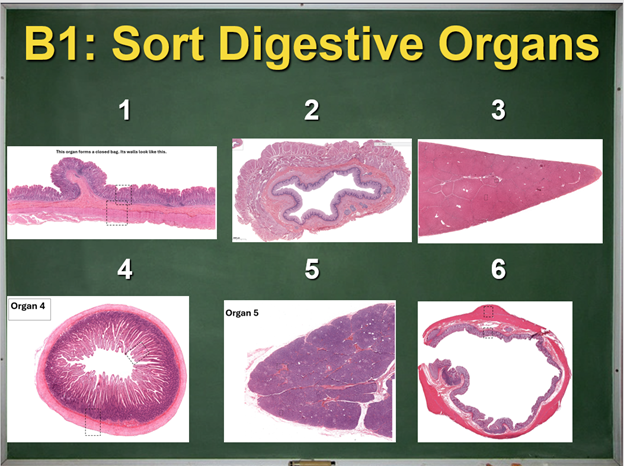
I think that’s about it, right? The problem of life, solved! We have followed our scientific narrative exploring the growth of complex organisms all the way from cell division to the formation of organs. But how do we power this process? How do we get the resources needed to grow? I realized this was a problem related to the hierarchy of biological organization. What do we eat? Other organisms. What do our cells actually need? Individual molecules like glucose. So, we have evolved complex systems of organs that take the full organism and break it down into its constituent molecules. Time to explore how the digestive system does this. When people first started studying human anatomy, they had very curious ideas about what the internal parts do, like Galen’s belief that the liver helps to make blood, the lungs regulate body temperature, and more. This is quite understandable, since the function of the organs is quite challenging to deduce without the microscopic images that we have, such as the ones below.
(images used with permission from the authors: "www.HistologyGuide.com, T. Clark Brelje and Robert L. Sorenson, University of Minnesota, Minneapolis, MN")
I give students unlabelled images like these for each organ in the digestive system and ask them to sort the images into two groups based on their form. They quickly spot that some organs are hollow tubes and others are dense blobs. I have close-up images included with each, so they can tell that the tube-like organs have layers of muscle and interesting inner linings, while the dense organs are full of gland cells. This is how science works: we start with observations and soon find patterns! Next, I give students form and function cards that they match with the organs, providing some detail about the organ structures and operation. Now they can put the organs in order and consolidate their learning. I chose this process to make them do as much thinking as possible as they sort through the details, so it’s not just memory work: they are using a large set of skills that we have been developing throughout this unit.
Digestive problems: Lesson 13 So we have the basics of the digestive system under our belt and now it is time to explore some details. In this lesson we continue our case study framework. We are nurse practitioners and meet patients whose symptoms come from acid reflux and celiac disease. One thing we really like doing in these lessons is tying in knowledge from other units of grade 10 science. Here we get another take on acid-base reactions with the heartburn pain and total internal reflection as we order a colonoscopy for our patient! Based on the colonoscopy observations and a biopsy result, we help to diagnose the severity of our patient’s celiac disease. Our main goal for each of these case study lessons is to explain the patient’s symptoms using our newfound knowledge. This underscores the usefulness and power of the knowledge they are learning.
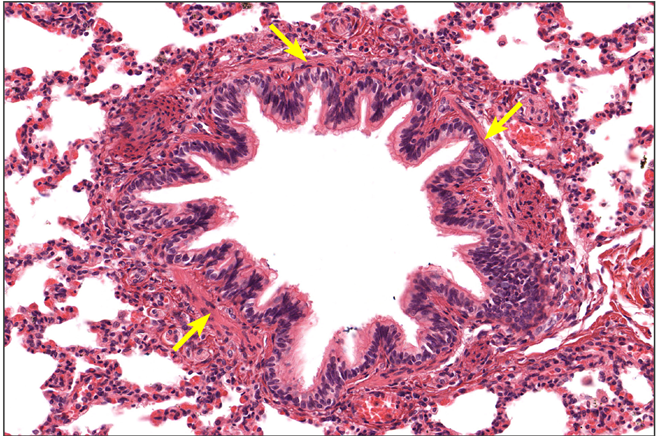
The mysterious respiratory illness: Lesson 14 It is January 2020 and you are helping an acutely ill patient in a French hospital. The situation is serious: an older male, very weak, very hot, with difficulty breathing. What tests should you perform? Temperature: 39.4oC. Pulse oximeter: 97 bpm, SpO2 = 78%. What does this mean? We compare the results with references: a very high fever and severe hypoxia (lack of oxygen in the blood). We put the patient on oxygen and order a chest x-ray. You are a pulmonary surgeon and remember back to grade 10 science when you first learned about the respiratory system. And here we begin our exploration of the lungs. Quick observations reveal some very telling structures in the bronchioles:
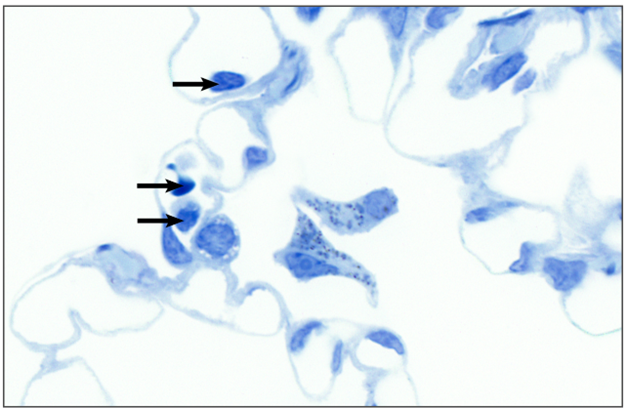
A thin layer of muscle rings the passageway (indicated by yellow arrows), which connects with asthma. Gland cells around the bronchiole secrete the mucus that we cough up when ill. Once students can recognize a few key cell types, there is so much they can notice and start to explain! I find the structure of the alveoli fascinating:
Red blood cells are indicated by the arrows in the image above; extremely thin endothelium cells form the capillary walls that these blood cells are moving through. What a great example of form and function. Ideal for diffusing gases through!
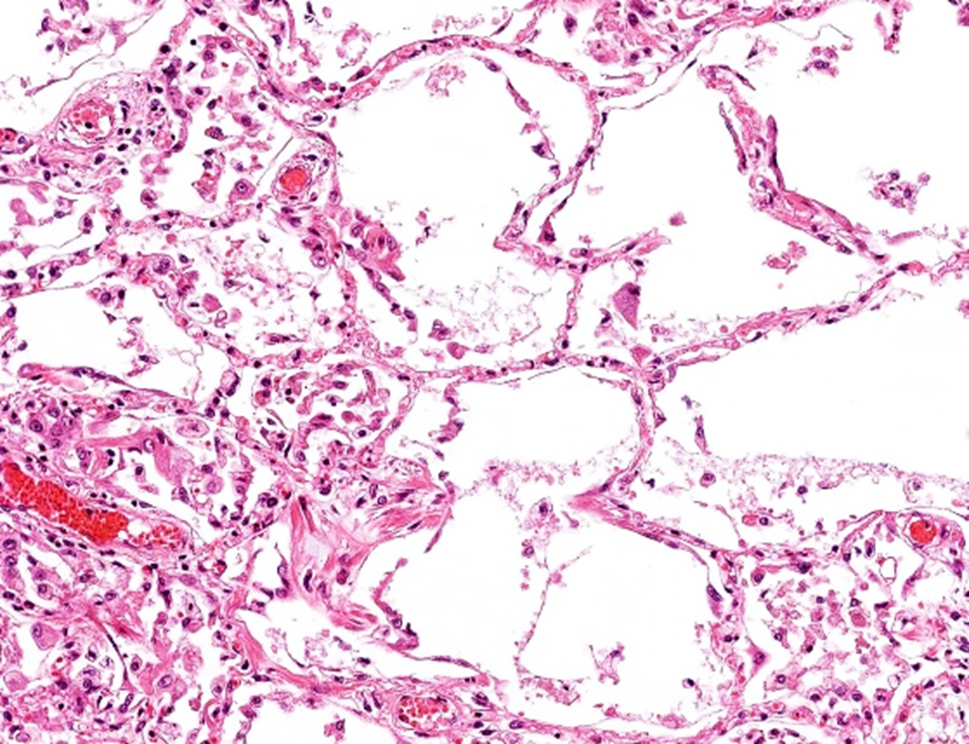
Your patient’s lung tissue biopsy comes back from the lab and it doesn’t look good:
The alveoli are filled with white blood cells! Some alveoli are damaged and broken. In other places, the epithelium lining of bronchioles is gone. The lung tissue is being destroyed by the immune response! We quickly order the patient to be intubated and administer antiviral drugs. Hopefully we can save the patient!
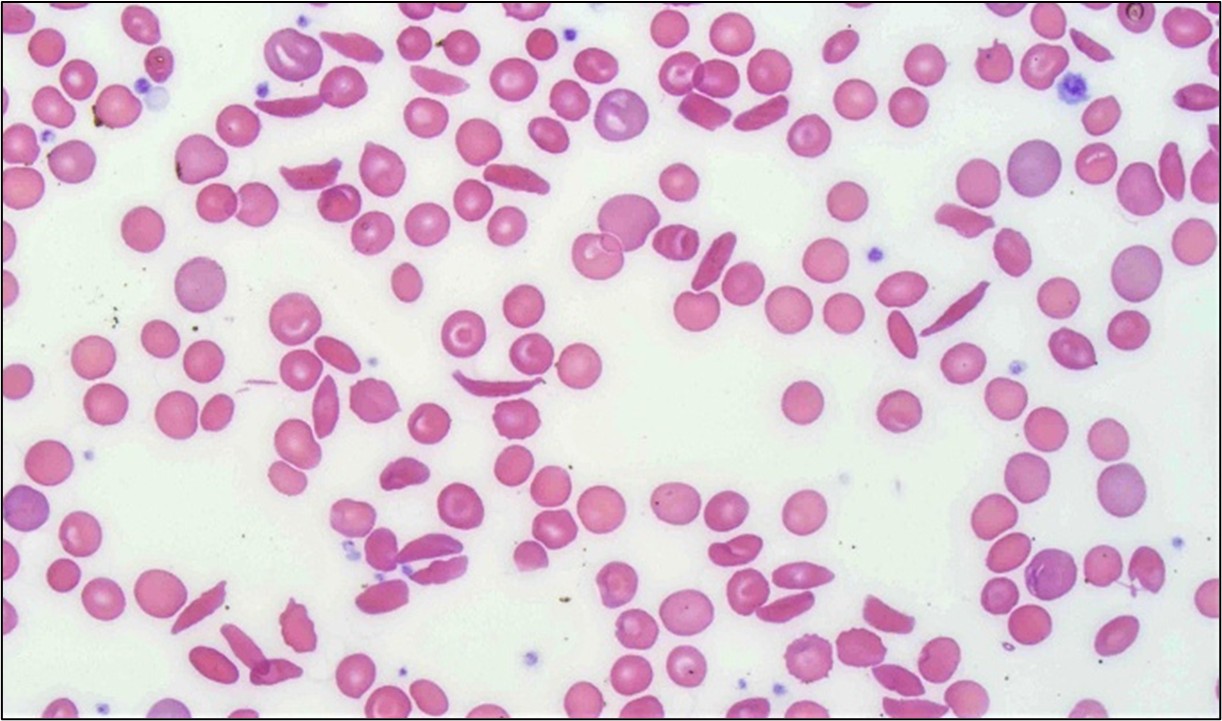
Strange blood cells: Lesson 15 In our final lesson, a patient enters our community health clinic complaining of chronic weakness and pain throughout her body. We order a blood test and blood smear. The test shows a low red blood cell count and the smear shows some strange looking cells:
In this image we see normal red blood cells, purple white blood cells, tiny dot platelets, and strange sickle-shaped cells. Having explored the respiratory system, we wrap up the unit by exploring the circulatory system. Since we have discussed the exquisitely small nature of capillaries, students don’t find it hard to figure out the problem with the strange-shaped cells. They get stuck in the small blood vessels and starve the body’s tissues of oxygen.
A favourite unit So this was the grand tour through the grade 10 biology unit, which is now my favourite unit to teach in grade 10 science. It is rich with scientific exploration and connects to us as organisms in so many ways. The narrative of growth helps each lesson to feel meaningful; always adding pieces to a larger scientific picture. The case study framework helps students think of themselves in future medical roles, and provides a rationale for learning. Our focus on observations using authentic scientific and medical images helps our learning to feel realistic, meaningful, and interesting. If you would like to explore the resources I have assembled, please feel free to visit my site: https://sites.google.com/tdsb.on.ca/htc-meyer/home/10-science/10-biology.