Chris Meyer
President, Ontario Association of Physics Teachers
Hybrid Teacher-Coach for Science, Toronto District School Board
christopher.meyer@tdsb.on.ca
Welcome to part three of my “Quick Guide” series! We have dealt with the
introduction to our physics course and the
motion unit, which means it is time to tackle the topic of forces. There are many tips and tricks I have come across in physics education research and from refining my own practice that I would like to share with you, so read on! My challenge for you is to choose at least one tip from the list below to try out this year during your unit on forces.
Start with a deep idea: Interactions
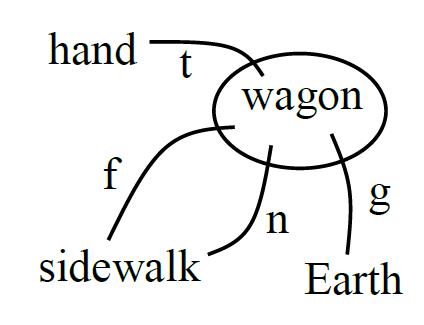
The idea of interactions was quite new to me about eight years ago but has since proven to be extremely useful. The idea is this: whenever two objects affect one another they
interact. For example, that wagon you are pulling along the sidewalk is interacting with your hand, the sidewalk and the Earth. This might sound strange or trivial, but if you give it a solid try with your students, you will see its many benefits. Our main tool is the interaction diagram: a simple conceptual representation of interactions that help students identify forces.

Here are some of the benefits that come with membership to the interactions club:
- Interaction diagrams are a very helpful preparatory step for drawing a force diagram. No more porcupines shot with arrows!
- Interaction diagrams are very useful when sorting out situations involving multiple objects and their mutual forces.
- Students learn to identify when interactions (and therefore forces) are present. This helps eliminate Aristotelian ideas about forces, such as a force (“impetus”) continuing after contact.
- The idea of the third law is built into interactions: both objects affect one another.
- Interactions can also involve exchanges of energy, providing a deep unifying foundation for both force and energy
- Advanced physics students in university will learn that the deepest formulations of physics use interactions and energy representations in a Lagrangian or Hamiltonian mathematical framework. The idea of force dissolves away into momentum and energy, when interactions reign supreme!
Here is the
lesson we use to introduce interactions in grade 11. If you are curious, you can watch this lesson in this video I created and see how the students explore this new idea.
This
article goes in to greater detail about interaction diagrams.
Working the system
I am a big fan of the word “system”. It has helped clarify so much of what we talk about in our physics classes. In the past, I used it only when discussing energy or momentum conservation, but it is helpful for so much more. It serves as a mental highlighter: physicists use it to identify the objects of interest whose properties we wish to keep track of. My students begin to use it when we introduce interactions (see tip #1 above) and learn to identify system objects verses objects in the environment, outside the system. A
powerful trick is learning to change the choice of objects in the system in order change which forces we consider internal or external. The system idea sets up a clear thinking process: our interaction diagrams illustrate the choice of system, our force diagrams represent the external forces acting on the system, and the “m” in the second law represents the mass of the system. Student now have a means of deciding which mass value to substitute into the second law when there are multiple objects — no more haphazard guesses!
Talking about forces
There are some helpful ways to tidy up the language we use to describe and compare forces. Here is terminology you will find helpful:
- “Force Diagrams”: The words “free” and “body” don’t provide any meaningful clarification to the diagrams we so commonly draw in physics. But do you know what does? The word “force”! Let’s draw force diagrams. Simple test: ask your students which is a more sensible label?
- “Balanced”: I used to compare opposing forces and accidentally say things like “equal”. When referring to vector quantities such as forces, “equal” has a very specific meaning: both the magnitude and direction of the quantities are the same. Watch out for this! Say “the forces are balanced” instead.
- “Add to zero”: Multiple forces combine to give a net force of zero because of the mathematical operation of vector addition. Please don’t say that the forces “cancel”. Say “balance” or “add to zero”. The term “cancel” is carelessly used to describe the division operation (we should say “divide away” instead) and “cancel” suggests the forces might somehow disappear from existence.
- “State of force”: We commonly talk about the “state of motion”, but the first law unites sets of motion and force phenomena that always accompany one another (see tip #4 below). For example, a system moving with a constant velocity will also have a net force of zero. So each “state of motion” has an accompanying “state of force”. I find “state of force” a very useful phrase when asking students to explain their thinking. I will commonly ask: “OK, what state of motion do we observe? Alright, then what is the state of force in the x-direction?” and students will say “balanced” or “unbalanced”.
- “Third Law Force Pairs”: For the love of all things Newtonian, don’t ever say the words “action” or “reaction” in the context of the third law. Newton’s choice of words in the Principia were unfortunate; the words “action” and “reaction” obscure so much and clarify so little! See the discussion of the 3rd law (tip #6)
- “mass”: Yes, good ol’ “mass” does the job instead of using the problematic word “inertia”. As soon as you say “inertia” to a beginning student, they start to use the term as if it was a force. Take the classic dishes and table cloth trick. Students will say things like “inertia caused the plate on the tablecloth to …” and no matter how they finish that sentence, it’s wrong. Save the word for more advanced discussions in university. What is mass? A property of objects that causes changes in velocity to take time: more mass, more time. If a force acts for a short interval of time, there is very little change in velocity and the plate remains (mostly) in place. I could do the same experiment and move the cloth slowly, guaranteeing the plate will be found on the floor. In both cases the “inertia” was the same. Just don’t ever mention “inertia”.
The Rich First Law of Motion
The first law of motion is like a cheese fondue where you only have cheese for dipping and no bread so you have to put the cheese-coated cheese on another hunk of cheese: that is to say, rich and overwhelming. I didn’t realize this for many years of teaching until it finally dawned upon me that 90% of the difficulties my grade 12s in their forces unit stemmed from a weak understanding of the “simple” first law. I thought I was so careful because I took a whole class to teach just the first law. Now I take roughly three lessons and separately explore many of the ideas that make up this amazing law. The first law of motion is really a catalogue of corresponding force and motion phenomena: this force situation (“state of force”) goes with this motion situation (“state of motion”). Here is my list of ideas that go in to understanding the first law:
- What is a constant force?
- A single force can have the same effect as many unbalanced forces, so these must be the same state of force (“unbalanced”).
- Balanced forces can have the same effect as no forces, so they should be considered the same state of force (“balanced”).
- Rest is the same as constant velocity, because they are associated with the same state of force, so they should be considered the same state of motion.
- The acceleration state of motion corresponds to the unbalanced state of force.
- The rest/constant velocity state of motion (and balanced forces) is hard to study because it is often obscured by friction forces that actually unbalance things.
- When a state of force changes, the state of motion simultaneously changes. There is no delay.
- Only forces external to the system (see tip #2) determine the state of force.
Each of these ideas needs to be explored before students can understand this rich law. Note that the idea of inertia is not needed to explain any of this! Here is the
sequence of lessons I use to teach the first law. In this video you can watch my students tackle the first law in one of these lessons.
The Quantitative 2nd Law
The second law answers the question “how much?” Think of it as a law of cause and effect: this much force causes this much acceleration for this much mass. We emphasize right from the start that the mass in question is the system mass (see tip #2), the same system that we represented using our force diagrams. In fact, a force diagram is a kind of picture of the second law equations. Because the 2
nd law is a vector equation, we teach our students to separate it into component equations right from the start. However, in grade 12 there is another helpful way to think about the second law: not as a component equation, but as a magnitude and direction equation. When we explore
circular motion, we restate an important aspect of the second law by saying “force parallel to the velocity changes the speed and force perpendicular to the velocity changes the direction”.
The Subtle Third Law: Force Pairs
If the first law is rich, the third is subtle and counterintuitive. It is difficult to understand how rigid, inanimate objects (a table, a floor) can exert forces at all – they just sit there! Equally challenging is understanding how a colliding truck and car exert equal size forces on each other when the car gets totaled! Each of these elements needs to be carefully explored. The language of the third law is problematic. Please never say the words “action” and “reaction” because they suggest cause and effect or a sequence of events. They also suggest the third law only works for a pair of object where one is active (like people) and the other passive or reactive (like tables and walls), but not pairs of people or a table leaning against a wall. I spend four lessons on ideas that directly address these conceptual challenges. How should we describe the third law? Here is my attempt:
Every interaction gives rise to a pair of forces that: are the same size, are opposite in direction, are of the same type, act on different objects, and exist simultaneously. We call these two forces a “third-law force pair”. We use third-law notation to show this:
The third law can’t be made any simpler than that without leaving out an idea that is critical for introductory physics. Here is the
lesson sequence we use to introduce the third law in grade 11. In
this article I explore the teaching of the three laws of motion in more detail. In this video my grade 12 students go through a third law lesson that reviews and extends these ideas.
Focus on core ideas within the force unit
Students need lots of time and opportunities to develop the basic force skills that relate directly to interactions and the three laws of motion — more than we usually provide. I have heard graduate students and, dare I say it, high school teachers (including yours truly), give incorrect explanations using the three laws. Let’s agree that these laws are tough to understand and tough to use. To provide the time to deal with this, we need to remove many of the side topics that crop up in physics textbooks and the curriculum. Here’s the test: if you and your students work with the idea for only one class and never see it again, it’s probably not a core idea that is really crucial to cover. Examples that I have eliminated from grade 12 are: (non)inertial frames, apparent weight, elevators, and “artificial gravity”. These are all interesting topics, but not mission critical! And when we cover examples like pulleys, string, and groups of connected objects we take the time to explore how a pulley works, how tension in a string works, and how objects in a group interact with one another (see tip #9). None of these are straight forward and each deserves its own lesson.
Linked knowledge helps with problem solving
My students develop a routine for
approaching pretty much every force problem:
- Draw an interaction diagram (see tip #1)
- Draw a force diagram
- Write the x- and y-components of the 2nd law
This linked set of tasks becomes one mental chunk, using a term from cognitive psychology. When we cement links like these, it reduces the cognitive load when working through a challenging problem. You don’t usually have to solve the problem to complete these steps: they can serve as the preparatory work for the critical thinking that is necessary to find the problem solution.
Composite Objects
I like to call objects with related accelerations “composite objects”. Students need to explore carefully what happens when, for example, we push two boxes in a row or stacked on one another, or objects connected by ropes and pulleys; there is a lot of subtlety to these situations. I have seen these problems given in grade 12 (and even grade 11) where the force understanding of the average student is not up to the task. As a result, students frantically copy answers from one another or the teacher and memorize possible solutions. Instead, students should explore these situations in detail using interactions (see tip#1) and changing systems (see tip #2). These techniques help to conceptually justify why an Atwood machine, for example, can be analyzed in one step using the system mass (see tip#2) of the two objects and the two external forces of gravity. When students change the system being used to analyze a composite object, interactions can change between being internal or external. This is a powerful technique that hides uninteresting forces inside the system, allowing us to focus on key forces that are now external. This approach explicitly teaches students the reasoning that helps solve classic problems like finding the force of tension between the 10
th and 11
th cars in a train instead of leaving them to bungle through such a problem (many do exactly that, making 10 calculations). Here is our
grade 12 lesson on composite objects. In this video you can watch my students wrestle with these ideas.
Circular Motion
Circular motion is a minefield of challenging concepts and subtle techniques, requiring a full article on its own to cover all the bases. Here is
an article where I delve into much more detail about circular motion. For the quick guide, I will list the most important tips here:
- You might use x- and y-directions in your mathematical work, but give them additional labels such as “radial” or “tangential”. Once you do, you can clearly describe directions like “radially outwards” or “forwards” and properly label forces and accelerations “radial acceleration" or “a tangential force”. Labels for directions (in addition to an “x” or “y”) also help to remind us that the radial and tangential directions point in a different spatial direction at each moment in time — a fact that tricks up students.
- The term “centripetal” is an additional label that we add to forces that happen to point radially inwards. It should only be used in verbal descriptions: “In this situation, what is the centripetal force? The force of tension.”
- The symbol Fc should never be written! The centripetal force is an idea rather than a specific force that needs labelling. If you introduce the symbol Fc to students, they think of it as an additional force when it is just an ordinary force like friction, gravity, normal, or tension. You will see them correctly draw all the forces and then draw an additional “Fc” force for good measure! The symbol Fc also gets interchanged with Fnet, which doesn’t clarify anything. We don’t need additional symbols for the sum of the forces in one direction — Fnet does that job nicely.
- Students need time to explore the effect radial and tangential forces have on the speed and direction of an object. This will allow them to generate the result that circular motion with constant speed is produced by a net force that points radially inwards.
- Students are very familiar with examples of acceleration resulting from changing speed. However, the situation of acceleration resulting from changing direction (with constant speed) is very unusual and even disconcerting! Students need time to explore this.
- Daily life leads to a powerful belief that we experience a radial outwards force when we move in a circle, one that students often label as Fc. Students need to reconcile this experience with a careful analysis of forces and the interactions that produce them (see tip#1).
Here is the
sequence of lessons we use to explore circular motion.
Rubrics help students refine skills
We train our students to compare their work against high quality exemplars in our
forces unit rubric page. After years of frustration trying to get students to draw decent force diagrams, I learned about the value of metacognition. Students need to regularly reflect on the quality of their work and identify how it should be improved. If they don’t practice doing this, of course they don’t improve! In
this article I explain the use of our rubrics and other ideas that help students improve.
Students enjoy physically testing predictions
Science is only useful because our theories produce predictions that match our observations reasonably well. The forces unit is fun because it provides lots of opportunities to quickly test simple predictions that students calculate. So, do exactly that: devise questions or tasks that have testable results. Students really enjoy the experience of seeing their prediction successfully verified. As a bonus, they get to practice an important scientific skill that gets glossed over in high school: deciding whether a predicted value agrees with a measured value using uncertainties! Here is an
article I wrote about verifying predictions and using uncertainties. Here is one quick example: a cart is at rest on an incline, predict the size of the tension force parallel to the incline that prevents it from moving. Here is the
lesson on 2-D forces that this example is from. Watch students make this test!
Address your choice of scalar notation and sign convention
I have always preferred to write my second law equations like this:
Fnet x =
Ft -
Ff =
max. When I look at this equation, I can immediately visualize forces at work. This makes a lot of sense to me but causes my students great difficulty because I am changing the rules of the vector-scalar game. In our study of motion, we use scalar notation for vector quantities and allow those symbols to take on negative values depending on their direction. For example:
v2 =
v1 +
aΔ
t, where
a = -9.8 m/s
2. But in the world of forces, I use a different convention: all force symbols in the component equations for the second law are positive quantities (magnitudes) with the direction (the positive or negative sign) shown outside the symbol. What made my practice worse was that I didn’t clearly address this and let students practice the new convention. I simply expected them to “pick it up” on their own. I think it took me a dozen years to properly address this. I still change the rules of the game for forces, but now I carefully address it while we are still exploring the first law in grade 11. Explore how we do this in our lesson on the
Force-Motion Catalogue. Watch my class go through this lesson in this video.
Oh, did I mention models?
How is your modelling career going? If you do physics, it should be going great! Modelling is a powerful conceptual process where we create a simplified abstraction of a physical situation complete with a set of assumptions and limitations. Using models is really helpful in the forces unit because we routinely examine situations where reality doesn’t quite agree with our models (based on our theories). For example, we predict the acceleration for a dynamics cart on an incline and, sure enough, the measurements don’t match the prediction! Has science failed? The modelling idea teaches students to expect these differences and provides language that helps to sort it out. Students say things like this: “Oh, the acceleration is smaller than we predicted. Hmm … what were our assumptions? We assumed that there was no friction. That assumption might not be valid. If we added friction to our model, the acceleration would be smaller, so I bet friction is responsible for this difference.” Here is the
lesson we use that includes this example. In
this article I introduce the idea of models and connect them with the study of motion.
Good luck with your forces unit! I hope you find some suggestions here that you can use right away and others that challenge you further down the road. There’s always more to learn!
Tags: Forces, Pedagogy
