Roberta Tevlin, Editor OAPT Newsletter, Teacher at Danforth CTI
Roberta@tevlin.ca
We need to incorporate more diverse examples of scientists in our courses. Sara Cormier (Physics Instructor at McMaster University) and I are trying to develop resources that will help teachers to do this. (If you would like to be a part of this — please send me an email!)
I started to compile a data base of good examples when I found myself completely distracted by the work of Rosalind Franklin. Her work on the X-ray crystallography of DNA fits perfectly into a lesson about the interference of light! As well as showcasing an important female scientist, an examination of her work can deepen students’ understanding of interference patterns and it highlights a very important connection between biology, chemistry and physics. I found a couple of short videos and a really simple, cheap demo that shows why the interference pattern formed by DNA provides clear evidence of its helical structure!
Qualitative Observations of Interference Patterns
Before looking at Franklin’s work, the students need a firm grounding in the interference patterns of diffraction gratings which are much simpler. I use gratings with 5360 lines per inch because they provide a large angular spread, which allows students to examine the interference patterns in small groups at their desks. These gratings can be purchased
here for about a dollar each.
The students should hold the gratings horizontally and direct the beam down through them onto the table. Keeping the beams vertical helps ensure that no stray laser beams go into anyone’s eyes. If the students are using red laser pointers this safety procedure isn’t needed. However, it is always a good idea to practice safe techniques. You should also let them know that the green, blue and UV laser pointers are a real danger. You can find more information about laser safety
here and
here.
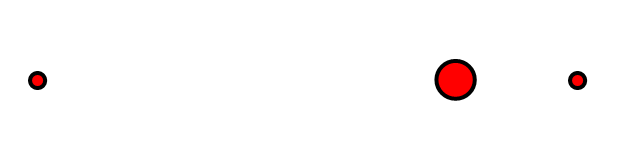
I give the students some time to do open exploration with a single grating. They notice that the pattern consists of a very bright spot with two bright spots on either side. They might also notice a fainter pair further out if the classroom is dark. They find that rotating the grating about a vertical axis, causes the line of dots to rotate by the same amount. They also find that if the grating is tilted about a horizontal axis, the pattern becomes asymmetric, like the diagram below. Why does this happen?

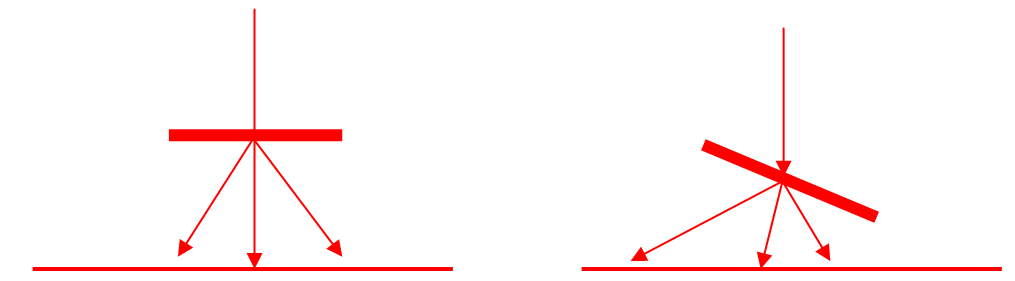
This asymmetry of the pattern above can be understood by looking at the side view diagrams below.

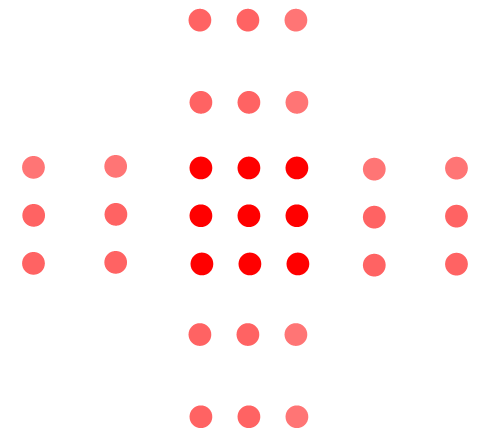
Next, I ask the students to predict what they will see if the light passes through two gratings laid on top of each other. There are a variety of possibilities depending on how the two gratings are aligned. Three of these are shown below.


If the two gratings’ slits are in the same direction, it looks like the pattern on the left. It is just like a single grating, except that they are probably slightly out of alignment because the film in the frame can shift slightly. If they are at right angles, you get the middle pattern. If the two slides are rotated by an angle in between these two extremes, they will form an ‘X’ pattern as seen on the left. Crossed gratings form an ‘X’ and the angle between the directions of the slits of the gratings determines the angle between the arms of the ‘X’. We will see this same pattern when we look at the DNA images.
Finally, the students are asked to predict what they will see if the light goes through a fine mesh. I find that a good quality, slightly transparent white cloth works well. This could be the material from a shirt, handkerchief or sheer curtain
There is an “X’ pattern made of many more dots which are much closer together. You should do this as a demonstration so that you can enlarge the pattern with a really big separation between the screen and the grating. This pattern has many more dots, closer together because the separation between the threads is much larger than the grating separation. You can remind them that sin(
θ) =
n λ/
d and that sin(
θ) can’t be greater than 1. You can reinforce your explanation by demonstrating the pattern from two coarse diffraction gratings that are at right angles.
Quantitative Observations of Interference Patterns
Now that the students understand how the different patterns are formed, they can be challenged to use the pattern to calculate the spacing between the slits. The wavelength of the light is labelled on the pointer. My pointers are 630-680 nm, so I have the students use the average value and recognize there is considerable error in the second digit. They should hold the grating far from the floor, so that
L (the distance from the grating to the screen) and
x (the distance between the central spot and the first interference spot) are larger, which will improve the precision. They should use
L and
x to calculate the angle, which is around 20°, and then use this angle with sin(
θ) =
λ/
d to get the spacing. This should be around 1.6 μm for the gratings I use.
X-Ray Crystallography and DNA
A crystal consists of rows of atoms which can act as a diffraction grating. However, the spacing is about a thousand times smaller, so we need to use a much smaller wavelength of light, such as X-rays. X-ray crystallography has allowed scientists to determine the structure of many materials and this work has resulted in 28 Nobel Prizes! The most famous image in X-ray crystallography is Photo 51, which was taken by Rosalind Franklin in 1952 using DNA crystals. You can find it
here.
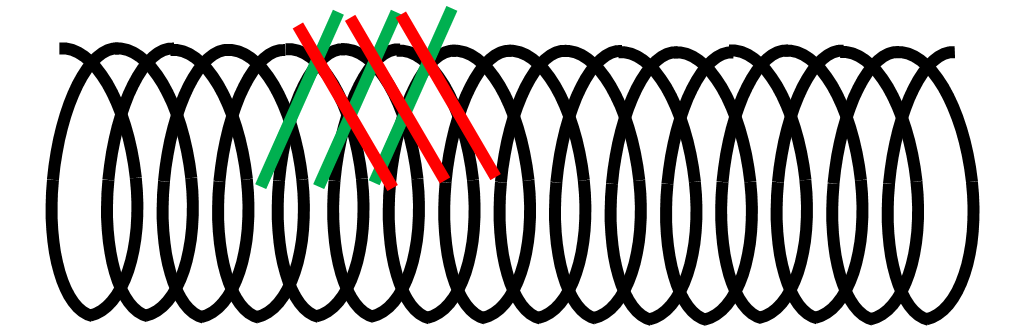
The most important part of this image is the large “X’ made of many dots. This shows that DNA has a helical structure. You can get a very similar pattern by taking the spring out of a ball point pen and shining the light through the side. Why does a helix result in the pattern that we saw with crossed gratings? Have the students look at a spring from the side. A side view of a helix looks like crossed diffraction gratings as is shown in the diagram below.

Both patterns have many dots because the spacing is so large compared to the wavelength. This is what we saw with the fabric — but not the crossed gratings.
The demonstration will be clearest if you have a large, dark room and a bright laser pointer. The wire of the spring should not be too thin, or the central spot will be so bright that it will overwhelm the interference pattern. Franklin also had this problem, so she masked the centre spot, which you can see in the centre of the photograph. Franklin measured the separation of spots and the angle formed by the ‘X’ and used these to determine a number of details, including that the rungs of the DNA ladder are separated by 0.34 nanometers and that there are ten rungs in each complete twist.
I recommend showing this 2-minute video after you do the demo. “DNA diffraction with a LASER! || MinuteLaboratory #14”.
The video shows the demonstration using a tiny coiled filament of a light bulb instead of the spring from a pen. This provides a clearer view of the interference pattern within the ‘X’. The video explains how you can use measurements from the photo to calculate various dimensions of the spring. It also provides pictures and information about how Franklin’s work was needed by James Watson and Francis Crick’s theoretical work.
Rosalind and Sexism
Most of the other videos that I found focussed on biographical aspects of Rosalind Franklin instead of her scientific work. What is her story?
The 1962 Nobel Prize for determining the structure of DNA went to James Watson and Francis Crick for their theoretical work and to Maurice Wilkins for his X-ray crystallography. Franklin was not included. She could not receive the prize because she had died of cancer four years earlier. (She was just 37 years old and the cancer may have been triggered by her work with X-rays.) However, even if she had lived, she might not have been included. Why? The Nobel prize can only be split three ways and the three winners never gave her work the credit it deserved — not in their papers and not in their speeches at the Nobel Prize ceremony. Furthermore, James Watson was particularly dismissive, sexist and offensive when he wrote about her in his very popular book The Double Helix. If you would like more details about what happened, I recommend reading
https://profiles.nlm.nih.gov/ps/retrieve/Narrative/KR/p-nid/187 and
https://physicstoday.scitation.org/doi/10.1063/1.1570771.
If you want to include a bit more historical detail, I recommend this 3-minute video “James Watson on X-ray crystallographer Rosalind Franklin”.
It paints a picture of a brilliant scientist who was ill-treated. If you have more time, there is also this detailed 25-minute video from NOVA “Rosalind Franklin Biography DNA: Secret of Photo 51”.
It is important that we directly address the issues of institutionalized racism and sexism in science. However, we should also make sure that we spend lots of time understanding and celebrating the great work that people have done.
I have put together a one-hour high school lesson incorporating this material. You can find the
worksheet and the
worksheet with answers and extra information.
As I mentioned at the top of this article, Sara Cormier (McMaster University) and I are hoping to put together a resource that will help high school and university educators include a more diverse set of scientists in their courses. If you would like to contribute to this effort please email me. Many hands make light work.
Tags: Diversity, History, Light, Nobel Prize
